How to Format Your Print Book in Microsoft Word Using Amazon KDP Templates





Formatting your book for print can feel overwhelming—but it doesn’t have to be! Amazon KDP offers free Word templates that make the process of formatting your book to self-publish much smoother. In this step-by-step guide, I’ll walk you through exactly how to take your manuscript and polish it into a professional print-ready file using Microsoft Word and Amazon KDP's Templates.
 Don’t forget: I also walk through this process in my video tutorial below—if you prefer to watch instead of read, hit play!

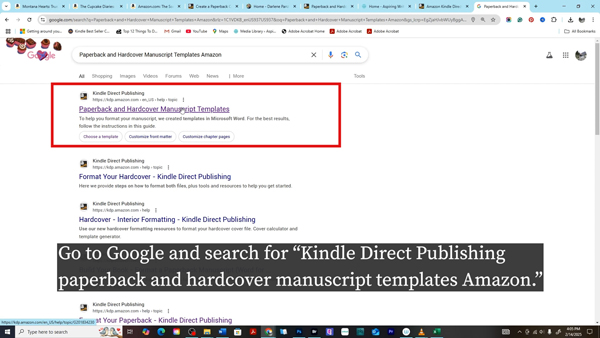
Step 1: Download the Amazon KDP Manuscript Template
Head to Google and search for “Amazon KDP paperback and hardcover manuscript templates.” The first link should take you directly to KDP’s official template page. You can choose between a blank template (clean pages) or one with sample content (helpful if you want to see how everything should be laid out).
Get Your Template Here: https://kdp.amazon.com/en_US/help/topic/G201834230
Step 2: Extract and Open Your Template
-
Save the template to a folder on your computer, e.g., “Paperback Manuscript.”
-
Right-click the downloaded ZIP file and choose Extract All.
- Choose your preferred language
-
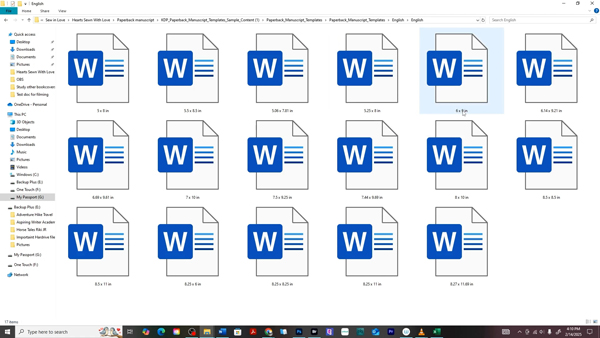
Navigate to your extracted files and select the document that matches your book size (e.g., 5.25” x 8”).
-
Open it in Microsoft Word and click Enable Editing to allow customization.
Open the template that suits your book’s size. Popular options include:
-
-
-
5.25” x 8” (common for trade fiction and romance)
-
6” x 9” (widely used for general print books)
-
8.5” x 8.5” (popular for children’s picture books)
-
-
Pro Tip: If you’re brand new to book formatting, I recommend starting with the sample version content template. It shows exactly where Amazon expects elements like chapter titles, dedication, and acknowledgements, and gives a nice blueprint to follow.
Step 3: Clean Up Your Manuscript
Before copying anything into the template, you are going to want to clean it up first for consistent formatting. First you are going to want to open your raw manuscript and turn on the Paragraph Marks Pilcrow (¶ icon on the toolbar or Ctrl+Shift+8). This shows hidden formatting.
- Fix any weird spacing caused by copying/pasting from different editors.
- Delete any repeated returns used to force new pages—your template will handle that with section breaks.
- Switch any red, yellow, blue, or any other colored or highlighted text to automatic black.
- Check inconsistent first-line settings.
- Check for unwanted spacing, tab indentations
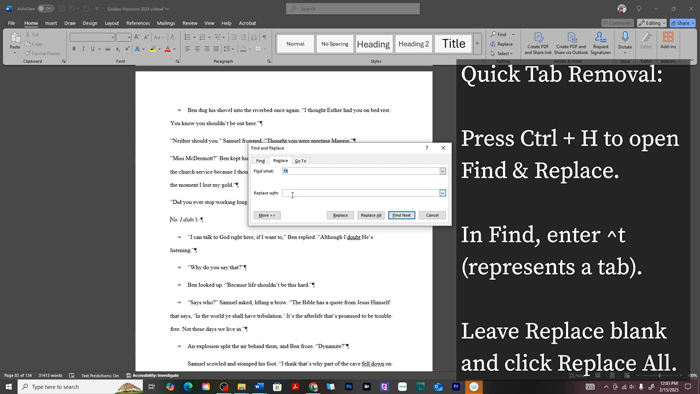
Quick Tab Removal:
-
Press Ctrl + H to open Find & Replace.
-
In Find, enter
^t(represents a tab). -
Leave Replace blank and click Replace All.
This removes all unnecessary tab indentations from your manuscript in one go.
Step 4: Set a Consistent Font and Size
-
Highlight the entire manuscript again (Ctrl + A).
-
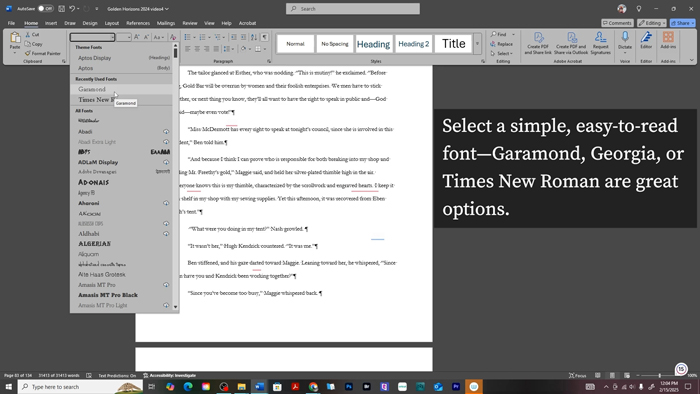
Select a clean, readable font such as Garamond, Georgia, or Times New Roman.
-
Set font size to 11 pt (common for print books).
Step 5: Adjust Paragraph Indents and Spacing
-
Highlight Your Manuscript
-
Press Ctrl + A to select your entire manuscript.
-
-
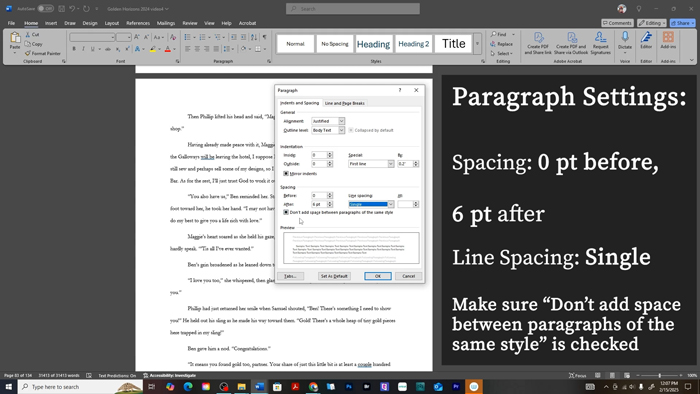
Open Paragraph Settings
-
Right-click on the highlighted text and select Paragraph… from the menu.
-
-
Set Alignment and Outline Level
-
Alignment: Justified
-
Outline Level: Body Text
-
-
Set Indentation
-
Inside: 0
-
Outside: 0
-
Special: First line 0.2”
-
-
Set Spacing and Line Settings
-
Spacing Before: 0 pt
-
Spacing After: 6 pt
-
Line Spacing: Single
-
Make sure “Don’t add space between paragraphs of the same style” is checked
-
-
Review for Consistency
-
Scroll through your manuscript to confirm all paragraphs have the correct indentation and spacing.
-
Headings, block quotes, or other special sections will need separate adjustments later on in formatting.
-
Why this matters: Proper paragraph indentation and spacing give your book a clean, professional look and ensure it prints correctly using Amazon KDP templates.
Step 6: Remove Track Changes and Comments
If you have worked with editors or critique partners, before finalizing your manuscript for print it’s essential to remove any tracked changes or comments left by editors, beta readers, critique partners, or yourself. Leaving them in can result in messy formatting or even accidentally printing notes in your book.
Here’s how to clean your manuscript in Microsoft Word:
-
Open the Review Tab
-
In Word’s top menu, click Review to access all editing and commenting tools.
-
-
Accept All Tracked Changes
-
If you have tracked changes, you’ll see red or colored markup in your text.
-
Click Track Changes → Accept → Accept All Changes in Document.
-
This permanently incorporates all edits into your manuscript, ensuring no leftover markup remains.
-
-
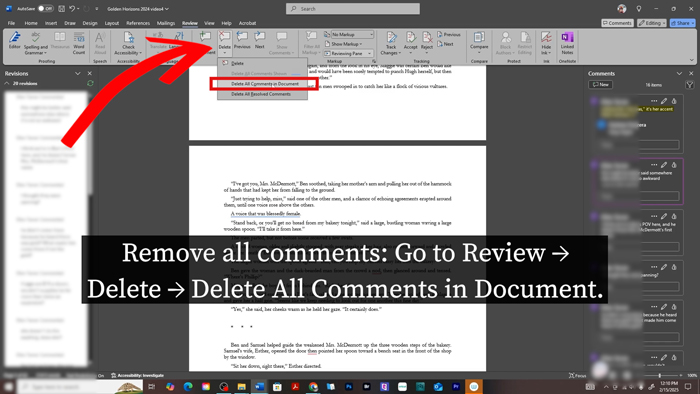
Delete All Comments
-
Comments may appear as sticky notes or highlighted text in the margins.
-
Go to Review → Delete → Delete All Comments in Document.
-
This removes any editor or reviewer notes, leaving a clean manuscript ready for formatting.
-
-
Double-Check for Leftover Markup
-
Scroll through your manuscript to ensure no strikethroughs, underlines, or comment indicators remain.
-
Sometimes minor formatting marks can remain if changes weren’t fully accepted—catching them now prevents surprises in print.
- Go through your manuscript and center any asterisks (*) that were moved to the left.
-
Step 7: Insert Your Manuscript into the Template
Now that your manuscript is formatted, it’s time to move it into the Amazon KDP print book template. This ensures your book matches the correct trim size, margins, and layout for printing.
1. Open Both Files
-
Open your final manuscript in Microsoft Word.
-
Open the KDP Word template that matches your chosen trim size (e.g., 6” x 9”).
2. Copy One Chapter at a Time
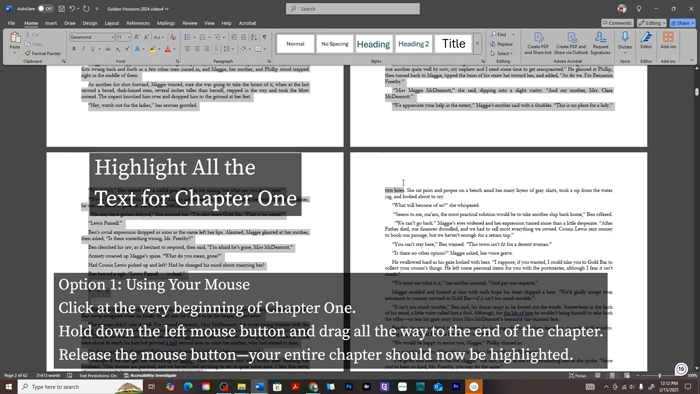
To avoid formatting issues, copy and paste your manuscript chapter by chapter.
How to Highlight Quickly:
-
Click at the start of your chapter.
-
Hold Shift and click at the end of the chapter (or drag with your mouse).
-
Press Ctrl + C (Windows) or Cmd + C (Mac) to copy.
3. Replace the Placeholder Text
-
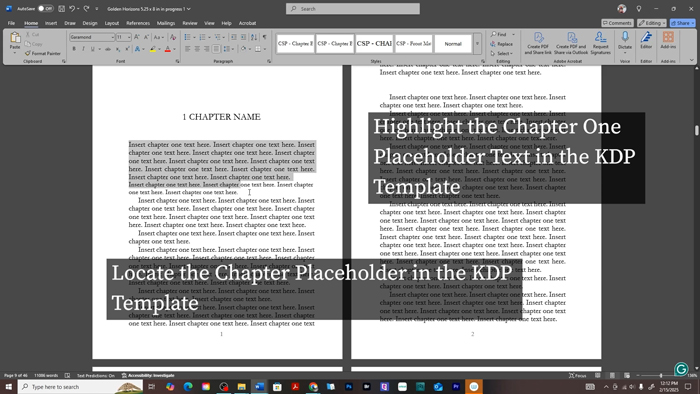
In the KDP template, scroll to the Chapter One placeholder or sample text.
-
Highlight only the placeholder text — don’t delete the section or page break below it.
-
Press Ctrl + V (Windows) or Cmd + V (Mac) to paste your chapter.
Pro Tip: Section breaks control where new chapters begin (usually on the right-hand page). Removing them can cause formatting issues later.
4. Review and Adjust Formatting
After pasting, scroll through your chapter to check for:
-
Extra spaces or line breaks
-
Indentation inconsistencies
-
Missing scene breaks
If something shifts, press Ctrl + Z (Undo) right away to restore the template’s layout.
5. Repeat for All Chapters
Continue copying and pasting one chapter at a time into the corresponding placeholders until your manuscript is fully inserted.
6. Final Checks
Turn on ¶ (pilcrow) symbols in Word to view paragraph marks and spacing. Make sure each chapter’s layout looks consistent.
Pro Tip1 : Keep a backup of your original manuscript before pasting—just in case something goes wrong during formatting.
Pro Tip 2 : Only highlight the placeholder words, not the section break or page break below them. These breaks control where new chapters begin in your print layout—deleting them may cause formatting issues.
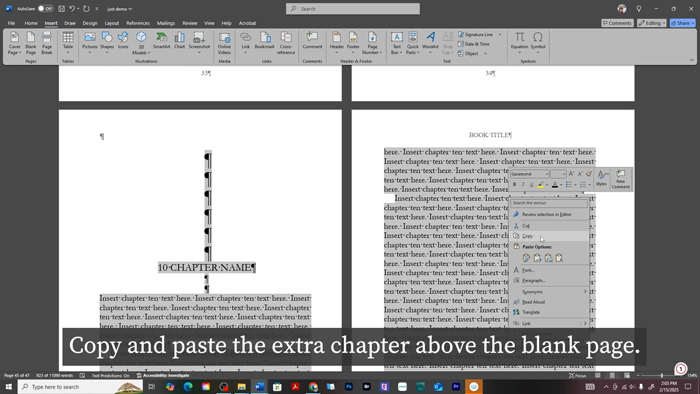
Step 8: Add Extra Chapters (If Needed)
-
Scroll to the last chapter of the template.
-
Insert a Blank Page: Insert → Blank Page.
-
Copy and paste the extra chapter above the blank page.
-
Convert page breaks to Section Break → Next Page: Layout → Breaks → Next Page.
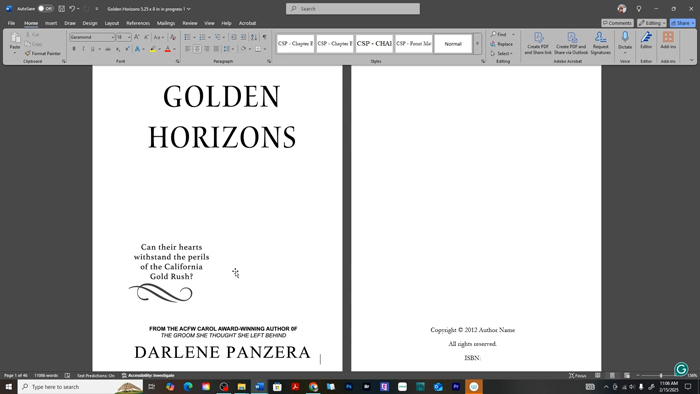
Step 9: Create Your Book Title Page
You can type your book title and author name directly into the template or insert a black-and-white graphic version of your book cover text. Just remember to Insert → Picture from Device (instead of copy-pasting) to avoid formatting glitches.
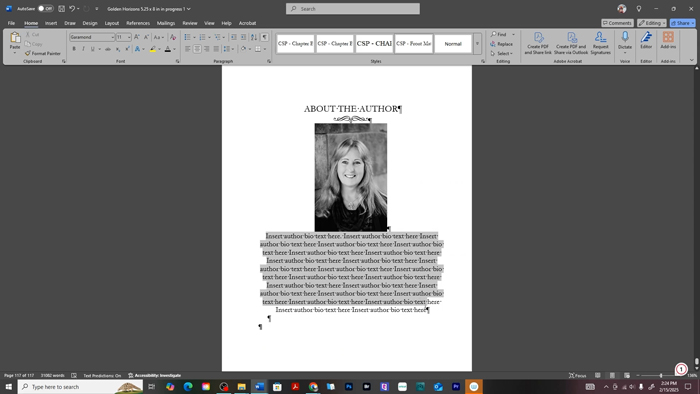
Step 10: Edit Your “About the Author” Section
Replace the sample text with your own author bio. You can also insert a small black-and-white author photo and decorative embellishments to personalize the page.
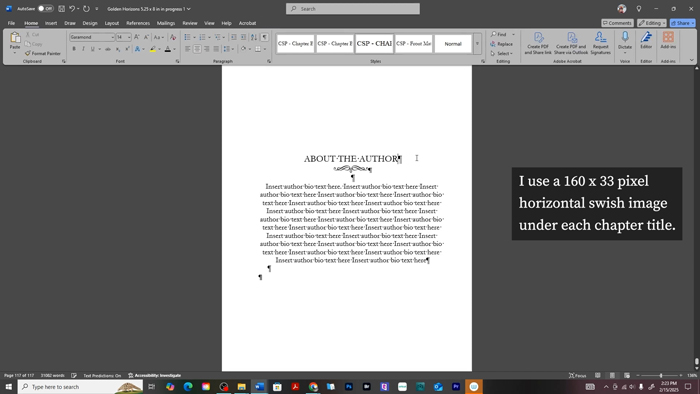
Add Embellishments:
To give your print book a professional and polished look, you can add small design elements like lines, symbols, or small graphics:
- Create a graphic ahead of time in Photoshop or Canva.
- Have the image sized to a small size, for example, I used an image 160 pixels by
- Then go to the home ribbon and select Insert → Picture from Device to add your embellishment underneath each chapter
Edit Your “About the Author” Section:
The “About the Author” page is often at the end of your book. Here’s how to format and update it:
-
Scroll to the end of your manuscript or locate the placeholder in the template.
-
Highlight the placeholder text and replace it with your bio.
-
Keep it concise, engaging, and professional—1–2 short paragraphs is enough.
-
Use the same font and size as the rest of your manuscript to maintain consistency.
-
Optional: Add a small headshot or black-and-white author photo. Go to Insert → Pictures → This Device and select your image. Resize and position it neatly on the page.
Pro Tip: After adding embellishments and photos, scroll through the page to make sure spacing looks consistent and nothing overlaps with text.
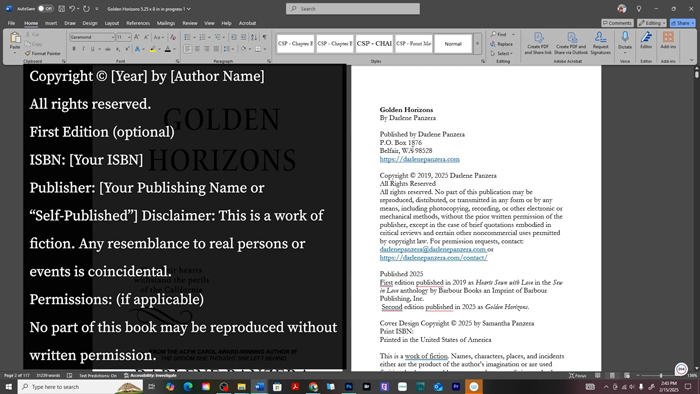
Step 11: Create Your Copyright Page
Your copyright page is part of the front matter and usually appears on the back of your title page. It gives your book legal protection and shares key publishing details.
At a minimum, your copyright page should include:
-
Book Title and Author Name – clearly state the title and who wrote it.
-
Copyright Year – use the year your book is published (and add the original year if it’s a new edition).
-
“All Rights Reserved” Statement – a standard line that protects your work from being copied without permission.
-
ISBN – either a purchased number or the free one provided by KDP.
-
Contact Information – your website, email, or both so readers and bookstores know how to reach you.
Keep the layout left-aligned, single-spaced, and professional. No page numbers or headers should appear on this page.
✅ Sample Copyright Page (based on Golden Horizons by Darlene Panzera):
Golden Horizons
By Darlene Panzera
Published by Darlene Panzera
P.O. Box 1876
Belfair, WA 98528
https://darlenepanzera.com
Copyright © 2019, 2025 Darlene Panzera
All Rights Reserved
All rights reserved. No part of this publication may be reproduced, distributed, or transmitted in any form or by any means, including photocopying, recording, or other electronic or mechanical methods, without the prior written permission of the publisher, except in the case of brief quotations embodied in critical reviews and certain other noncommercial uses permitted by copyright law. For permission requests, contact: darlenepanzera@darlenepanzera.com or https://darlenepanzera.com/contact/
Published 2025
First edition published in 2019 as Hearts Sewn with Love in the Sew in Love anthology by Barbour Books, an imprint of Barbour Publishing, Inc.
Second edition published in 2025 as Golden Horizons.
Cover Design Copyright © 2025 by Samantha Panzera
Print ISBN: 979-8992649536
Printed in the United States of America
This is a work of fiction. Names, characters, places, and incidents either are the product of the author’s imagination or are used fictitiously. Any resemblance to actual persons, living or dead, events, or locales is entirely coincidental.
Step 12: Dedication and Acknowledgements pages
If you want to include a dedication or acknowledgements, paste in your text and adjust the formatting. Many authors center their dedication and justify their acknowledgements for a polished look.
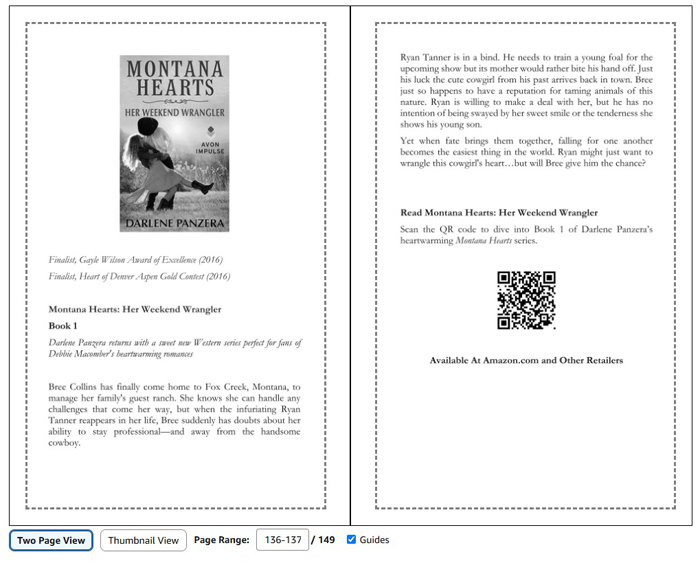
Step 13: Add Your Book’s Back Matter
The back matter is everything that comes after the final chapter, and it’s a valuable space to connect with your readers and encourage them to keep engaging with your work. Here are some common elements you can include:
-
A “Dear Reader” Letter – A short, personal note thanking readers for spending time with your book. You can also invite them to leave a review or share your story with others.
-
Bonus Content – Give readers a little extra by including a sneak peek at your next release or a sample chapter from another book. This helps build excitement for what’s coming.
-
Your Other Books – Showcase images of your other book covers, along with their back cover blurbs. This acts like a mini-catalog and makes it easy for readers to discover more of your work.
-
Mailing List Invitation – Encourage readers to stay connected with you by joining your email list. Let them know what they’ll get by signing up (exclusive updates, freebies, behind-the-scenes info, etc.).
 Important Tip: For print editions, remove all hyperlinks. Printed books can’t display clickable links, and leaving them blue and underlined can cause formatting or upload errors on Amazon KDP. Instead, unlink all web addresses and make sure the text appears in standard black font. For a more professional look, simply write out your website or mailing list URL in plain text—or include a QR code that readers can scan.
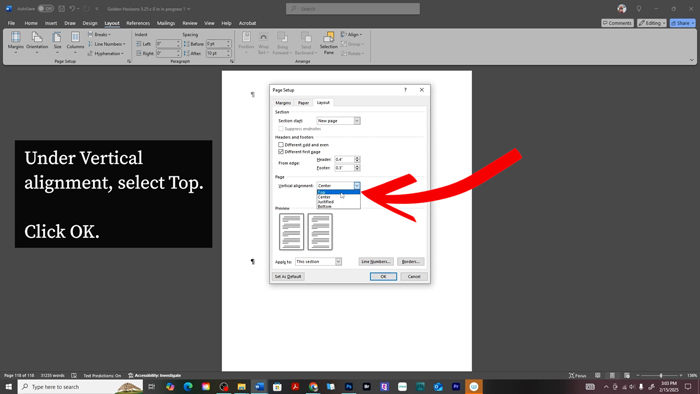
Text starting in the middle of the page? Here’s how to fix it:
Go to the Layout (or Page Layout) tab and click the small arrow in the Page Setup group (bottom-right corner). In the Page Setup window, open the Layout tab. Under Vertical alignment, select Top, then click OK.
Step 14: Match Chapter Styles Across the Book
Double-check that all your chapters are styled the same way: consistent font, size, spacing, and placement. Each chapter should begin in the same position on the page.
Step 15: Remove the Table of Contents Page from the Template
Most fiction print books don’t include a Table of Contents—it’s primarily used in nonfiction or ebooks where readers can click to navigate chapters. If your template has a TOC page, it’s best to delete it for a cleaner, more professional look.
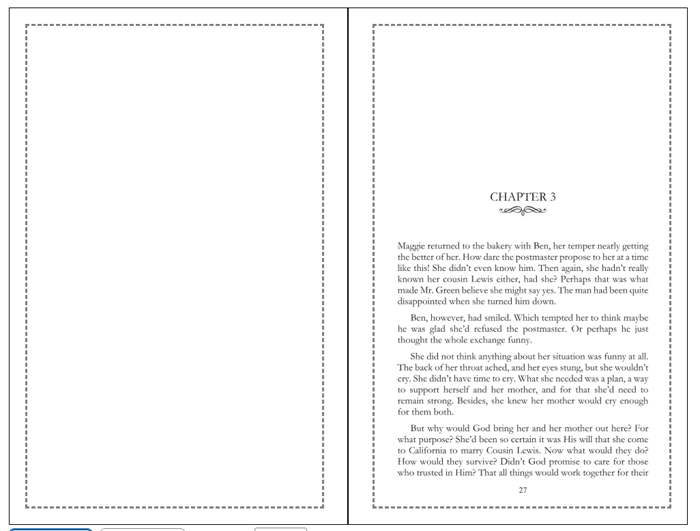
Step 16: Ensure Each Chapter Starts on a Right-Hand Page
Readers expect chapters to begin on a right-hand page (the odd-numbered pages). It’s a professional touch that makes your book feel polished. Depending on your manuscript, you may need to insert extra pages to force chapters to begin on the right-hand side. Here’s how:
1. Turn on hidden formatting
- Under the Home tab, click the ¶ icon (or press
Ctrl + *). - This shows section breaks, page breaks, and paragraph marks so you can avoid formatting mistakes.
2. Use Section Breaks (Next Page), not Page Breaks
-
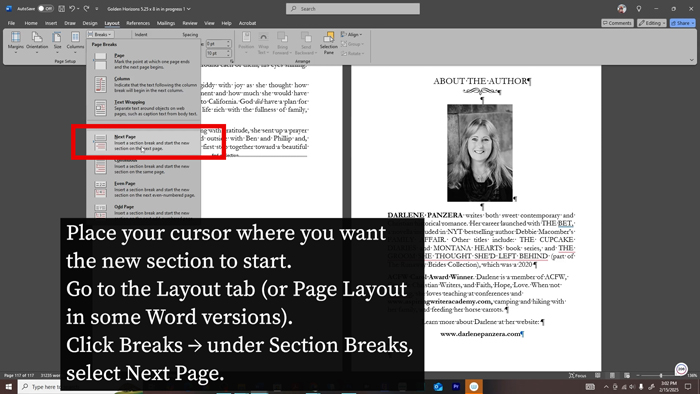
Place your cursor where the new chapter should begin.
-
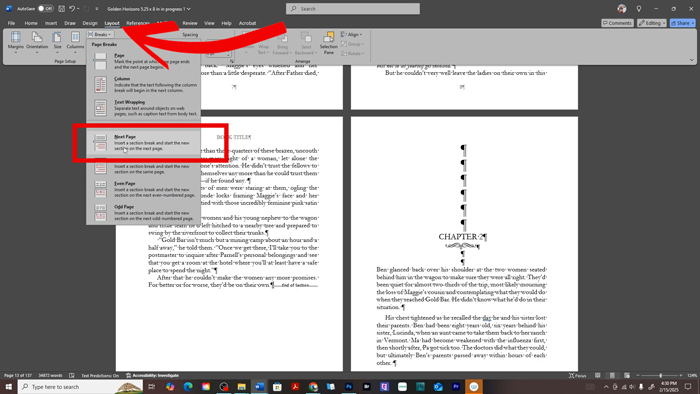
Go to Layout > Breaks > Section Breaks > Next Page.
-
This forces the chapter to start on a new page and gives you full control of headers and footers.
3. Insert blank pages when needed
-
-
If a chapter ends on an even-numbered page, you must add a blank page so the next chapter begins on an odd-numbered page, so the chapter starts on the right side.
-
Place your cursor at the end of the text, go to Insert > Blank Page, and then immediately add a Section Break (Next Page).
-
This guarantees that the following chapter opens correctly without throwing off headers, footers, or page numbers.
-
4. Format intentional blank pages correctly
-
A blank page should be truly blank—no page number, no header, no text.
-
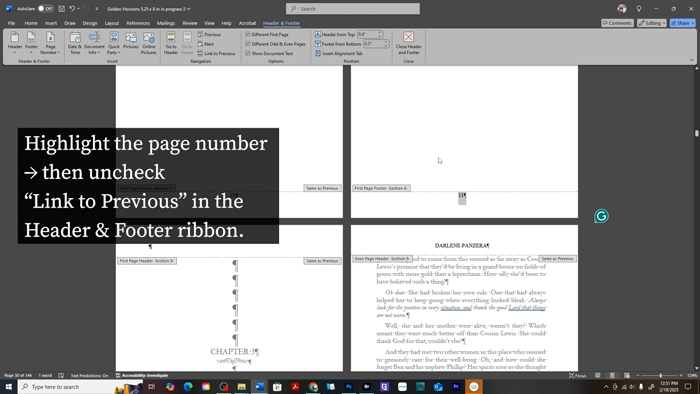
To remove these, double-click the header/footer area, uncheck Link to Previous, and delete any text or page number.
-
The rest of your manuscript will remain untouched.
Pro Tip: Avoid using plain Page Breaks between chapters. They can mess up mirrored headers, page numbering, and layout when exported to PDF or uploaded to KDP. Always use Section Breaks (Next Page) for better results.
 By taking these extra steps, you’ll avoid the amateur look of left-hand chapter starts, fix mirrored header issues, and ensure your book meets professional formatting standards.
Step 17: Formatting Headers and Page Numbers
Once chapters are aligned, you can set up headers and page numbers. This gives your book a professional, bookstore-quality feel.
1. Set up mirrored headers
-
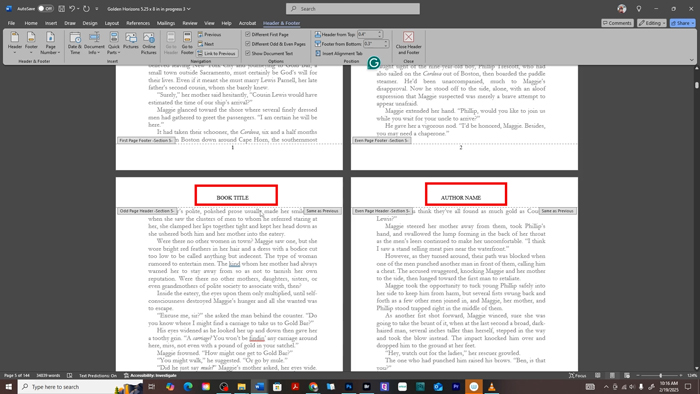
Double-click the header area to open the Header & Footer Tools.
-
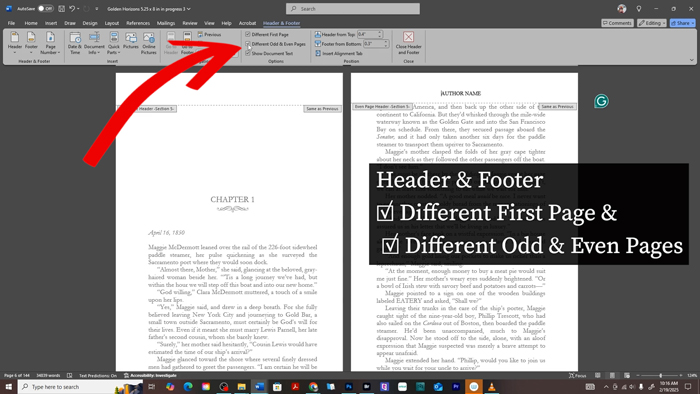
In the Design tab, check:
-
Different Odd & Even Pages → This allows one header style on right-hand pages and another on left-hand pages.
-
Different First Page → This prevents headers from showing up on chapter opening pages.
-
-
Suggested layout:
-
Odd (right-hand) pages: Book Title (aligned right).
-
Even (left-hand) pages: Author Name (aligned left).
-
2. Add page numbers
-
While still in the Header & Footer Tools, click Page Number > Bottom of Page > Plain Number (Center).
-
This places page numbers centered in the footer, which is the cleanest, most common style for novels.
3. Remove numbers and headers where not needed
Certain pages should never have headers or page numbers:
-
Title page
-
Copyright page
-
Dedication
-
Acknowledgments
-
Any intentionally blank page inserted to align chapters
to remove them: -
Navigate to that page’s header/footer.
-
Under Header & Footer Tools, uncheck Link to Previous.
-
Delete the number or text just for that section—your other pages remain unaffected.
4. Start numbering where the story begins
-
Usually, numbering begins on the first page of Chapter One.
-
Your front matter (title page, copyright, dedication, etc.) should be unnumbered.
-
To set this up:
-
Go to Insert > Page Number > Format Page Numbers.
-
Choose Start at: 1 on the first page of Chapter One.
-
5. Review for consistency
-
Scroll through the entire document.
-
Check that:
-
Page numbers increase correctly and start at Chapter One.
-
Headers alternate properly (title on right-hand pages, author name on left-hand pages).
-
Blank and front matter pages show no unwanted text or numbers.
-
Once this is done, your headers and page numbers will look just like a traditionally published book.
Step 18: Final Fixes & Manuscript Comb Through
Do one final scroll through your book:
-
Watch for stray formatting marks.
-
Make sure section breaks are intact.
-
Check that spacing and alignment are consistent.
-
Proofread carefully.
Once everything looks polished, save your file as a .docx and upload it to Amazon KDP for print.
Formatting a book in Word with an Amazon KDP template can feel technical at first, but once you’ve done it once, the process gets much easier. Take it step by step, and soon you’ll have a professional-looking paperback ready to share with readers!
See How to Upload a book to Amazon KDP
Other Posts You May Like:






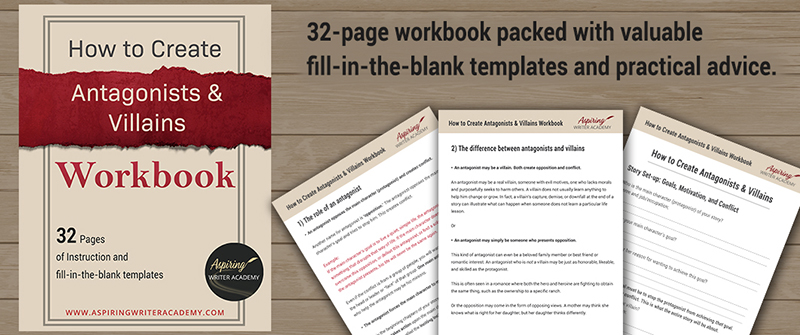
Do you find it difficult to create compelling antagonists and villains for your stories? Do your villains feel cartoonish and unbelievable? Do they lack motivation or a specific game plan? Discover the secrets to crafting villains that will stick with your readers long after they finish your story, with our How to Create Antagonists & Villains Workbook.
This 32-page instructional workbook is packed with valuable fill-in-the-blank templates and practical advice to help you create memorable and effective antagonists and villains. Whether you're a seasoned writer or just starting out, this workbook will take your writing to the next level.
We Believe All Authors Can Aspire to Take Their Writing to the Next Level!
Our Goal for Aspiring Writer Academy is to help people learn how to write quality fiction, teach them to publish and promote their work, and to give them the necessary tools to pursue a writing career.
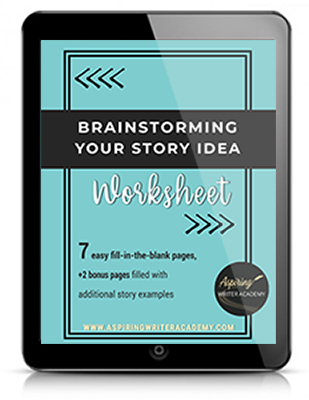
ENTER YOUR EMAIL BELOW
TO GET YOUR FREE
"Brainstorming Your Story Idea Worksheet"
7 easy fill-in-the-blank pages,
+ 2 bonus pages filled with additional story examples.
A valuable tool to develop story plots again and again.
Other Blog Posts You May Like
Scene & Sequel: The Secret to Plotting an Epic Novel
Scene & Sequel: The Secret to Plotting an Epic Novel (Part 2)
Writing Fiction: How to Develop Your Story Premise
12 Quick Tips to Write Dazzling Dialogue
10 Questions to Ask When Creating Characters for Your Story
Macro Edits: Looking at Your Story as a Whole
Basic Story Structure: How to Plot in 6 Steps
Writing Fiction: How To Keep Track of Time in Your Story
Behind the Scenes: Interview with the Authors of the “Sew in Love” Collection