How to Create and Set-Up a Professional Author Page On Facebook
This step-by-step tutorial shows aspiring writers how to create and set-up a professional author page on Facebook. Learn how to edit your ‘About’ section, link your page to your website, upload your profile picture and timeline cover, how to invite others to like your page, and so much more.
Create Your Page
First, you will want to log into your Facebook account. Once you are logged into your Facebook account you will want to hit the down arrow in the top right corner of your Facebook page. After you have clicked on the down arrow you will want to:
Click on Manage Pages if you already are managing a Facebook page.
Or if you currently do not have any Business Pages you will hit Create Page.

After clicking on Manage Pages (if you are already currently managing pages) you will be brought to another page where you can see all the different pages you manage. At the top, there is the Create A Page button. Click on that.

Another method to create a business account is from your Facebook home page, on the left sidebar under the text saying Explore. Click on the Pages tab.

Next You will be brought to a page where you can see all the pages you manage. From this page, you can click the green button in the top right corner that says Create A Page.

Choose Your Business Type
After clicking on Create A Page you will be prompted to choose what type of business Facebook Page you would like to create. Either a Business or Brand? Or a Community Or Public Figure. As a writer, you will most likely choose the Community or Public Figure. Remember as an Author you are a public figure now.

Create Your Page Name and Select a Catagory
Once you have chosen Community or Public Figure you will need to enter your page name. As an author, you will want to make sure that your page name matches what is on your books. Enter either your real name, or your pen name.
Next, Facebook will ask you to choose a category. As a writer, you will most likely want to choose Author.

Upload a Profile Picture
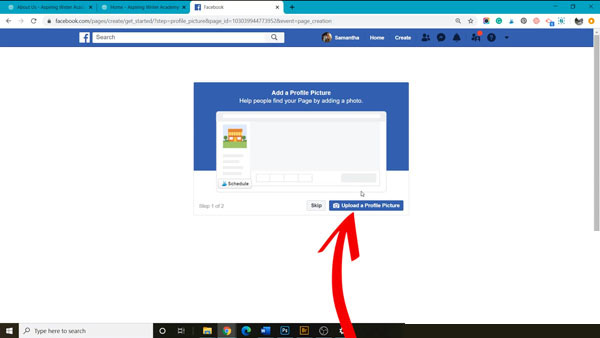
The next step is to select Upload a Profile Picture. As an author, this would be a professional headshot. You do not want a grainy pixilated photo or a selfie. Remember this page will be seen by fans and editors and while it is easy to hide away behind your book cover, people connect better with the real you. It is also more professional to have a crisp, clear, high-resolution headshot.
Upload a Timeline Cover
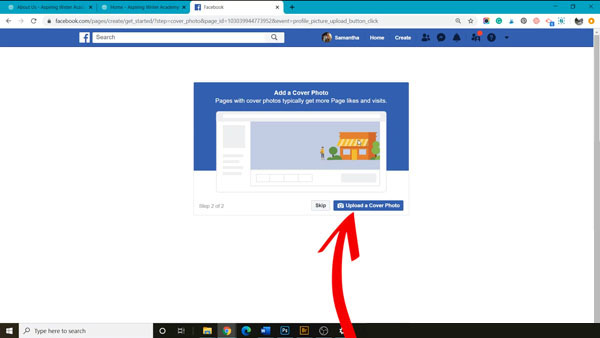
After uploading your profile picture you will be asked to upload a Timeline Cover. If you currently do not have a timeline cover ready to go you can hit skip and come back to it another time.
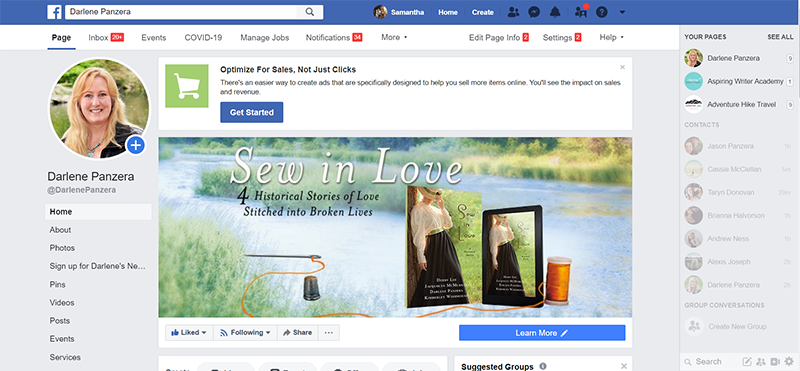
If you are already published, you may want your timeline cover designed to display your book cover. However, vertical book cover may have the text cut off without proper formatting. You can hire a professional graphic designer or make a timeline cover yourself with either Canva or Adobe Photoshop. If you are just getting started on building your author brand you can just put your logo and tagline.
If you hit Skip on uploading a timeline cover you can upload a cover later. On your new Author Facebook Page, you can hover the mouse over your timeline cover and click either:
Choose From Photos
Choose From Videos
Upload Photos/Video
Create a Slideshow
You also get options to Reposition your cover or Remove your timeline cover.

Create a Page Username
After creating your Facebook page timeline cover you will want to create a Page Username. Page usernames make it easy for people and other pages to tag your page in a post. This can potentially lead you to get more traffic to your page so you can gain more fans.
To get started click Create Page @username right below your author profile pic.
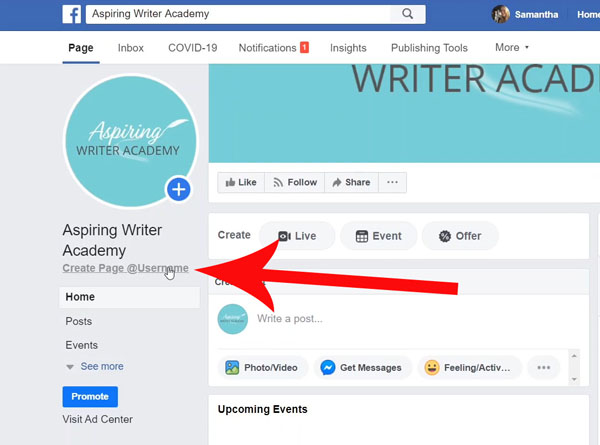
Your page username is all one word with no spaces following the @ symbol. Your page username should match your real name or author pen name. After you have entered your username click Create Username button.
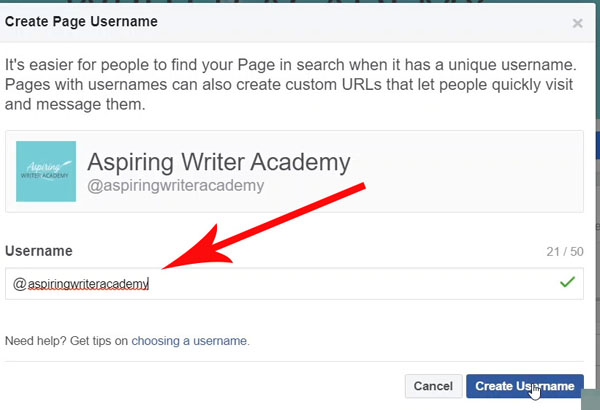
Add a Button to Your Website
If you already have a website you will want to connect it to your Facebook Author Page. By connecting your website to your Facebook author page you make it super easy for your fans on social media to visit your website. You can do this by clicking on + Add a Button.

After you have clicked on + Add a Button you will want to choose Learn More About Your Business. Then click the Learn More button. Once the Learn More button is selected click Next.

Click on Website Link.

Copy and paste your website URL and then hit Save.

Edit Your 'About' Section
On your business profile home page on the left-hand sidebar, you can see your About section. If you do not immediately see About, click See More, and then you should see About. Once you are in your About section, you can enter your website URL, Email (where people can contact you), Awards you may have won, and a short Author Bio.
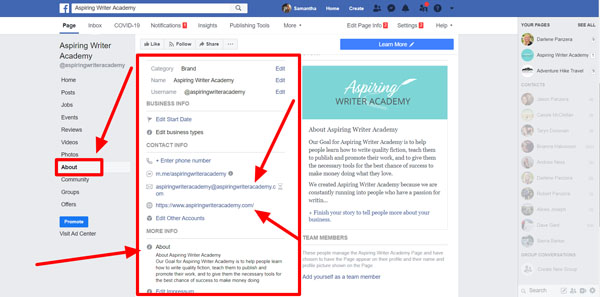
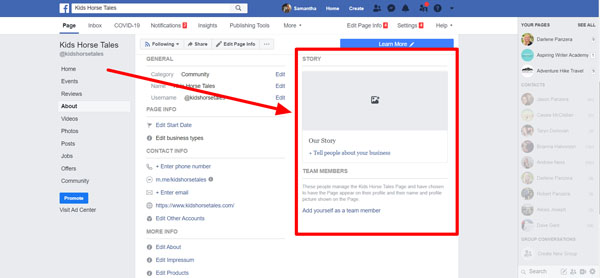
Edit Your Story
Your story can be much longer than the short author bio that you put in your About section. This is where you can share your journey as a writer and provide fun information that your readers may want to know about you.
Invite Your Friends and Family
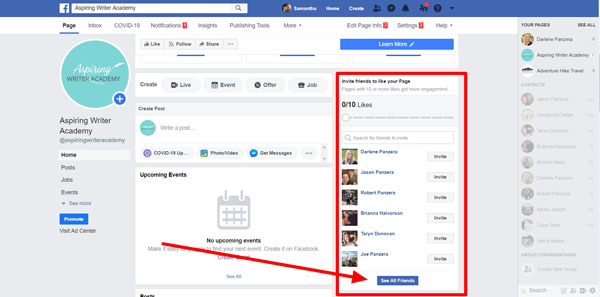
The final step is to invite your friends and family to Like your new Business Author Facebook Page.
Access Additional Page Settings to Edit
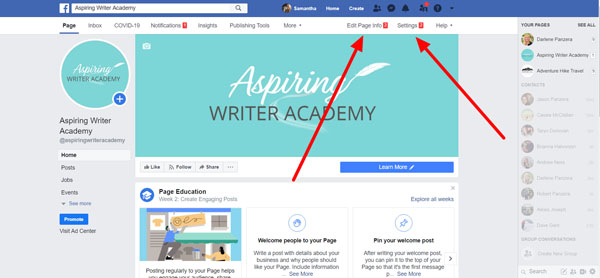
Another way to make changes is to access Edit Page Info which is located on the top bar. Or click on the Settings tab.
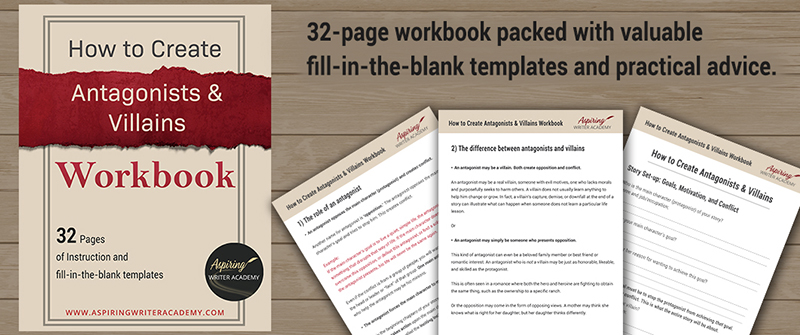
Do you find it difficult to create compelling antagonists and villains for your stories? Do your villains feel cartoonish and unbelievable? Do they lack motivation or a specific game plan? Discover the secrets to crafting villains that will stick with your readers long after they finish your story, with our How to Create Antagonists & Villains Workbook.
This 32-page instructional workbook is packed with valuable fill-in-the-blank templates and practical advice to help you create memorable and effective antagonists and villains. Whether you're a seasoned writer or just starting out, this workbook will take your writing to the next level.
If you have any questions or would like to leave a comment below, we would love to hear from you!
Our Goal for Aspiring Writer Academy is to help people learn how to write quality fiction, teach them to publish and promote their work, and to give them the necessary tools to pursue a writing career.
ENTER YOUR EMAIL
TO GET YOUR FREE
"First Steps Guide for Aspiring Writers" a 30-page comprehensive resource to get you started on your writing journey.
Other Blog Posts You May Like
Scene & Sequel: The Secret to Plotting an Epic Novel
Scene & Sequel: The Secret to Plotting an Epic Novel (Part 2)
Writing Fiction: How to Develop Your Story Premise
12 Quick Tips to Write Dazzling Dialogue
10 Questions to Ask When Creating Characters for Your Story
Macro Edits: Looking at Your Story as a Whole
Basic Story Structure: How to Plot in 6 Steps
Writing Fiction: How To Keep Track of Time in Your Story
Behind the Scenes: Interview with the Authors of the “Sew in Love” Collection
Samantha Panzera is an adventurous travel blogger, graphic designer, and multi-media business entrepreneur who uses the experience she’s gained over the years to teach aspiring writers the skills they need to build an author platform and take their careers to the next level.












Thank you. That was very helpful. I am creating my author page. Wish me luck. Prafulla.
We are so happy that you found our post helpful. Please let us know if you have any additional questions. And Yes! We wish you the very best with your new author page!
I have a Facebook Author Page, set up at least 5 years ago, but I am having trouble allowing organisations, such as my publisher and Goodreads, to access the page. When I click on the Goodreads facebook link it says: ‘User opted out of platform: The action attempted is disallowed, because the user has opted out of Facebook platform.’
I then read that I should set it up as a Business account, went to my page to add Business account, but then got the following message: ‘This feature isn’t available right now
We limit how often you can post, comment or do other things in a given amount of time in order to help protect the community from spam. You can try again later.’
Trying again later doesn’t work and I can’t find any information on FB Help to help me. Can you advise?
Many thanks
Penny Frances Author
Hi Penny
Sorry for the late reply. I’m just now seeing this comment. Here are some ideas and my best guesstimate on how to resolve the problem based off what you mentioned in your comment. But without actually seeing your page from your computer, I do not know for sure if these suggestions work. Probably the best thing would be to contact the Facebook Help Center. 😊 That being said, here is my best guess of what is going on with your account.
The error messages you received indicate that there might be some restrictions on your account or the settings that need to be adjusted.
For Goodreads, you may want to go to your Facebook Page settings.
Click on “Apps and Websites” or a similar option.
Look for Goodreads in the list and ensure it is allowed to access your Facebook account.
For the Page thing you may want to check if there are any privacy settings that might be preventing the access of third-party apps.
Review your Facebook Page settings, especially those related to visibility and access permissions for other organizations.
Double-check your account’s security settings to ensure they are not causing any conflicts with the access permissions.
If the issue continues, you may need to reach out to Facebook’s support directly for assistance. You can try reaching out to their support team via the Business Help Center for more personalized assistance.
Wishing you the best!
-Samantha