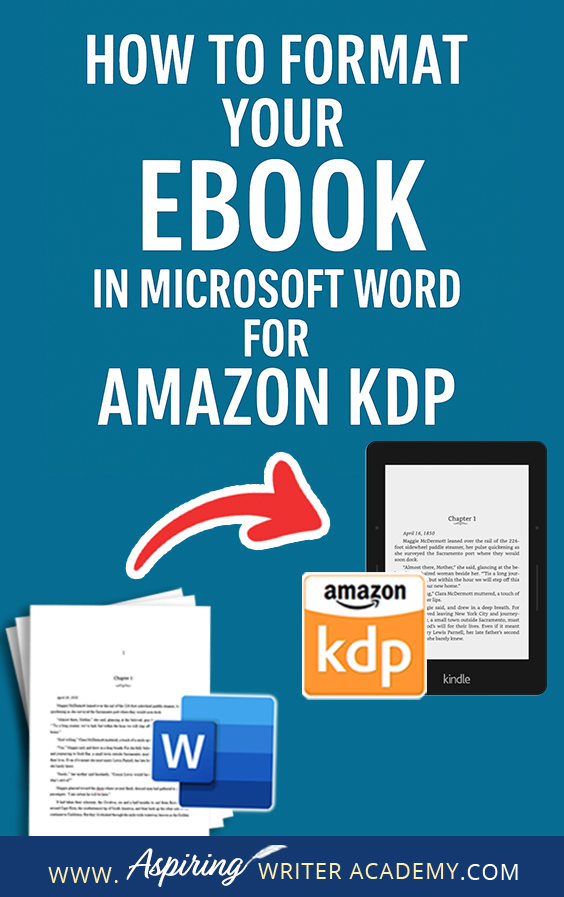
How to Format Your Ebook in Microsoft Word for Amazon KDP (Step-by-Step Guide)
Getting your ebook ready for Amazon KDP doesn’t have to be overwhelming—especially if you’re using Microsoft Word. Whether you're a first-time author or just need a refresher, this step-by-step guide will walk you through everything you need to know to format a clean, professional-looking ebook that’s Kindle-ready. From setting margins and font styles to creating a clickable table of contents and inserting page breaks, we’ll cover it all. Let’s turn that manuscript into a polished ebook ready to publish!

Step 1:  Remove All Markup & Comments From Document
Before you dive into formatting, it’s super important to tidy things up first. That means dealing with any tracked changes or leftover comments that could cause issues later on.
 Accept or Reject All Changes
If you’ve worked with an editor (or made tracked edits yourself), make sure all changes are finalized.
-
Go to the Review tab in Word.
-
Click on Accept or Reject for each change—or choose Accept All Changes and Stop Tracking if you're happy with everything.
 Remove All Comments
Comments won’t show up in your published ebook, but they can still cause weird spacing or formatting glitches.
If your document appears slightly shifted left, hidden comments may be present, but it is always a good idea to double-check that all comments have been removed before publishing your manuscript.
 How to Delete Individual Comments in Word
To remove a single comment from your manuscript:
-
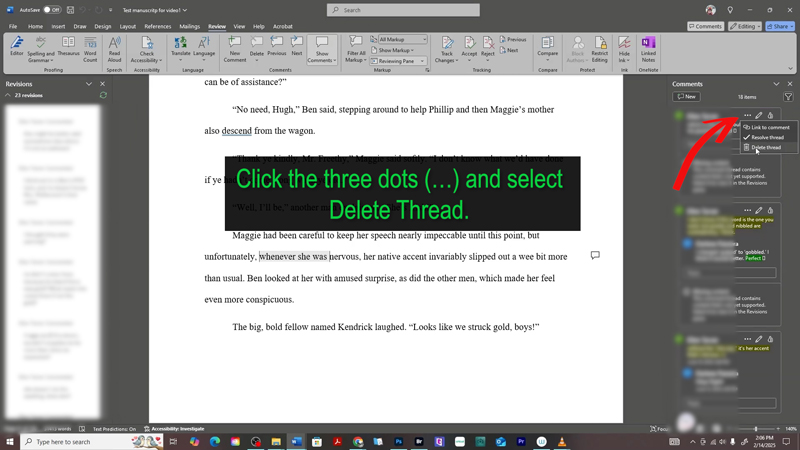
Click on the comment balloon in the right margin to select it.
-
Look for the ellipsis (⋯) in the top-right corner of the comment box.
-
Click the ellipsis, then choose “Delete Thread.”
-
This will delete that specific comment and any replies attached to it.
-

🧹 Remove All Comments at Once
To quickly delete every comment in your manuscript:
-
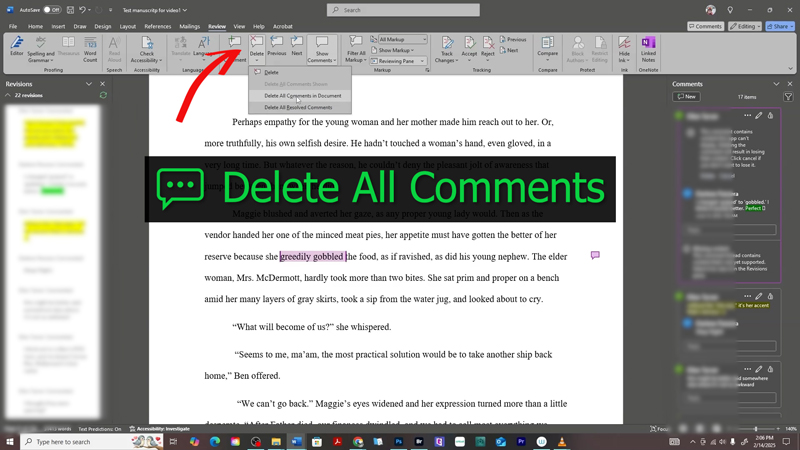
Stay in the Review tab.
-
Click the small arrow next to the Delete button in the Comments section.
-
From the dropdown menu, select “Delete All Comments in Document.”
✅ All comments throughout your document will be removed in one click—no need to delete them individually!
✂️ Turn Off Track Changes
Before formatting, make sure you're not accidentally tracking new edits.
-
Go to the Review tab.
-
Click Track Changes to turn it off (the button should no longer be highlighted).
-
In the dropdown next to Display for Review, select No Markup to hide any tracked changes.
✅ This ensures you’re working with a clean view as you format your manuscript.
Cleaning up your document early helps prevent any weird surprises in your final Kindle ebook.
Many authors forget to remove tracked changes, comments, and other leftover editing marks—these can accidentally appear in the published version. You definitely don’t want that!
That’s why I always start by turning off Track Changes and deleting all comments. It’s a simple step that keeps your manuscript clean and ready for formatting.
 Step 2: Formatting Your Manuscript
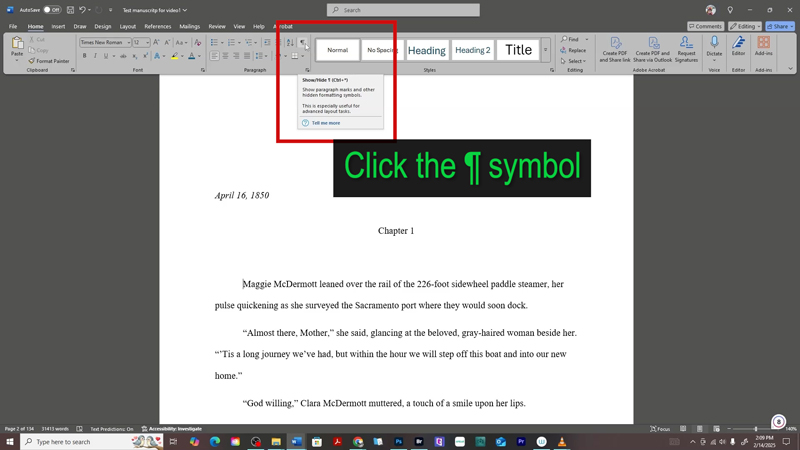
👀 Turn On the ¶ Symbol While Formatting
Click the ¶ (pilcrow) icon in the Home tab to show formatting marks. This lets you see hidden elements like paragraph breaks, extra spaces, tabs, and section breaks—things that can mess with your ebook layout if left unchecked.
➡️ What Those Arrow Marks Mean
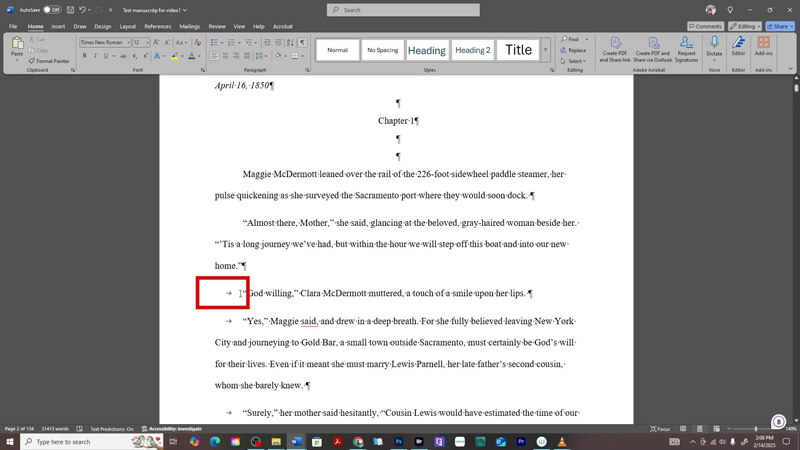
When you turn on the ¶ (pilcrow) icon to view formatting marks, you might notice small right-facing arrows (→) at the beginning of some lines.
These arrows indicate that the Tab key was used to create an indent. While this is common in regular documents, tabs can cause inconsistent formatting in ebooks—especially when viewed on different devices.
💡 It’s better to remove these tabs and use styles or paragraph indents instead for a more professional, ebook-friendly layout.
👉 So the next step is to remove all tabs from your document to clean things up before moving on.
🔍 How to Find and Remove All Tabs in Microsoft Word
To quickly remove all tab spaces from your ebook manuscript:
-
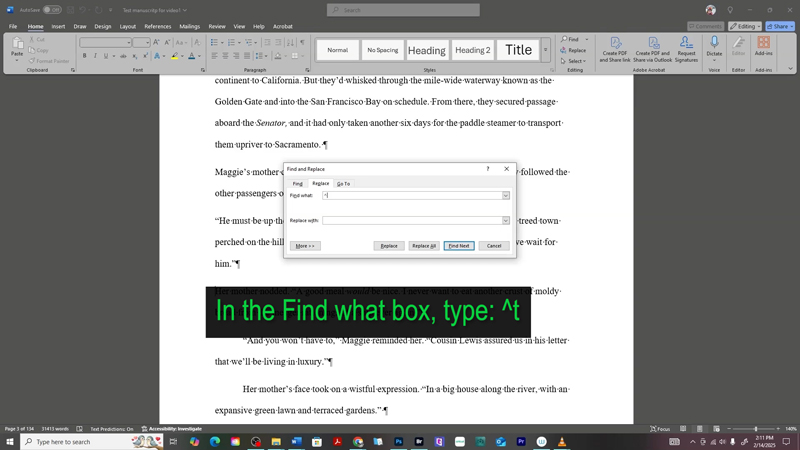
Press Ctrl + H (or Command + H on Mac) to open the Find and Replace window.
-
In the Find what box, type:
^t
(That’s a caret symbol followed by a lowercase “t” — it represents a tab.) -
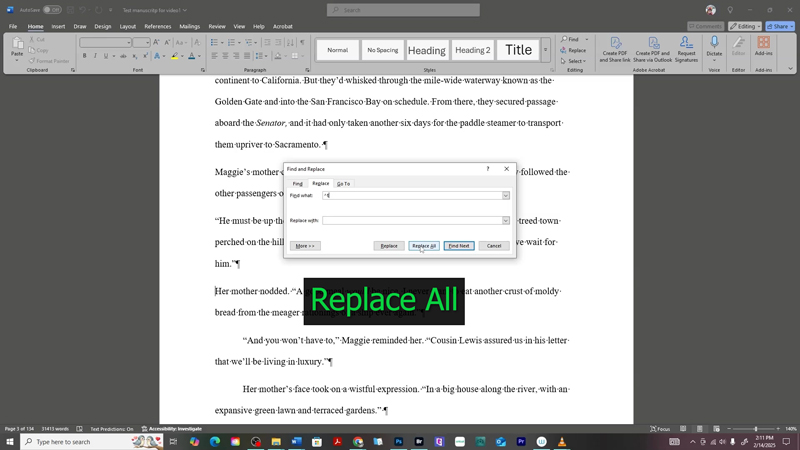
Leave the Replace with box blank.
-
Click Replace All to remove every tab in the document.
✅ This will clean up your formatting and prevent spacing issues when converting to Kindle format.
 Adjust Paragraph Settings
 Step 1: Select All Text in the Document
-
Press Ctrl + A (or Command + A on Mac) to highlight the entire document.
-
This ensures your changes will apply to every paragraph in your manuscript.
 Step 2: Open Paragraph Settings
-
With everything still selected, right-click on any highlighted text.
-
In the menu that appears, choose Paragraph.
This opens the Paragraph dialog box where you'll adjust indentation, alignment, spacing, and more.
 Step 3: Update Indentation and Alignment Settings
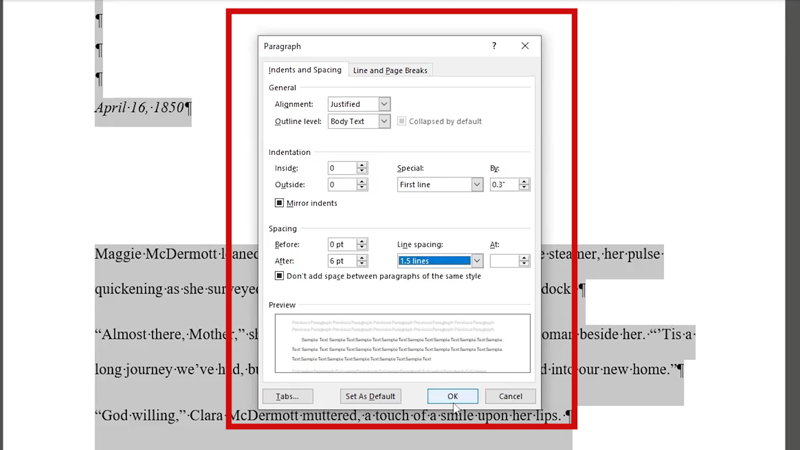
In the Indents and Spacing tab:
 General
-
Alignment: Choose Justified
This evenly aligns your text on both the left and right margins, giving your ebook a polished, book-like appearance.
-
Outline level: Select Body Text
📌 Indentation
-
Left and Right: Leave these at 0"
-
Special: Select First Line from the dropdown
-
By: Enter 0.3"
A 0.3-inch first-line indent is considered an industry standard for ebooks—it helps readers easily follow the flow of the story without crowding the page.
 Step 4: Set Proper Spacing
Under the Spacing section:
-
Before: Set to 0 pt
-
After: Set to 6 pt
This adds just enough space between paragraphs for readability, without making your ebook look too spaced out.
-
Line spacing: Select 1.5 lines
This increases legibility on digital screens.
-
Check the box that says:
“Don’t add space between paragraphs of the same style”This ensures Word doesn’t add weird extra spacing where it’s not needed—especially if you’re using the same style for body text.
 Step 5: Apply the Changes
-
Click OK to save and apply your settings.
These formatting adjustments will create a consistent, professional reading experience—making your manuscript look clean on Kindle while avoiding common layout issues like uneven spacing or awkward indentations.
 Step 6: Adjust Font and Font Size for Your Entire Manuscript
Consistency is key when formatting your ebook. Using a uniform font and size throughout helps your manuscript look clean and professional on all devices.
 Select the Entire Document
-
Press Ctrl + A (or Command + A on Mac) to highlight everything.
 Set the Font and Size
-
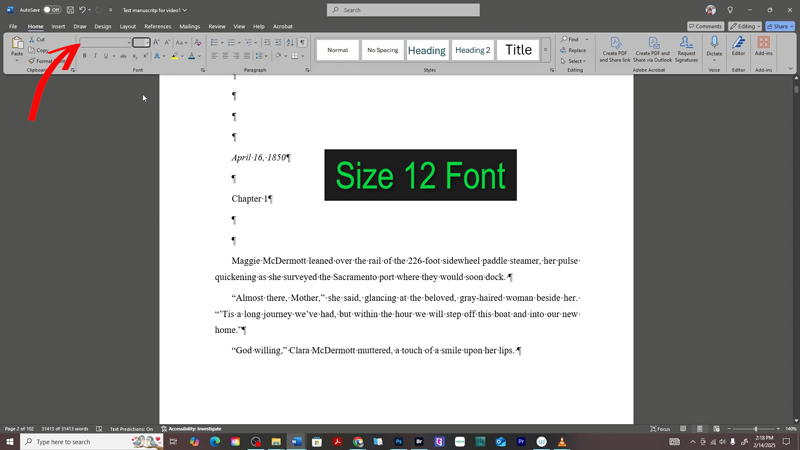
Go to the Home tab.
-
In the Font section:
-
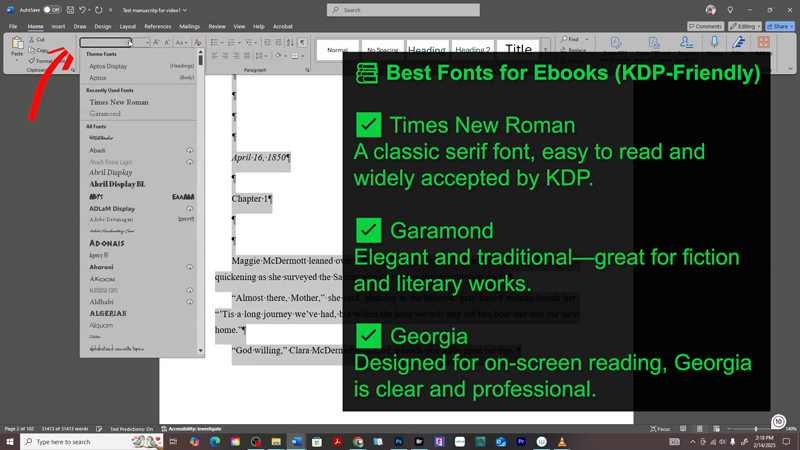
Choose a clean, ebook-friendly font like Times New Roman, Garamond, Georgia, or Arial.
-
Set the font size to 11 pt or 12 pt, depending on your preference.
Most ebooks are easiest to read in 11 or 12 pt size. Just make sure you apply the same font and size across your entire manuscript—no mixing fonts!
-
Step 7: Adjust Page Margins for Your Ebook Manuscript
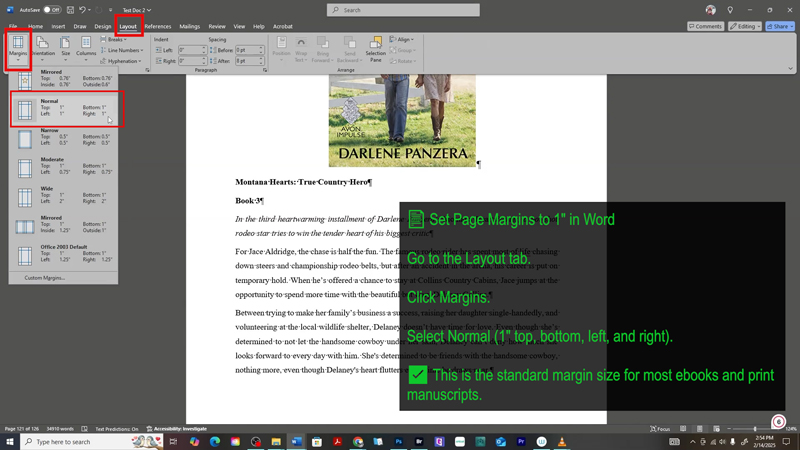
Set your page margins to a standard 1 inch on all sides to ensure your ebook content looks clean and professional across different devices.
How to do it in Word:
Go to the Layout tab → Click Margins → Choose Normal (1" top, bottom, left, and right).
 Step 8: Create a Custom Style for a Clickable Table of Contents
To give your Table of Contents a clean, polished look that matches your ebook's design, create a custom style just for it:
-
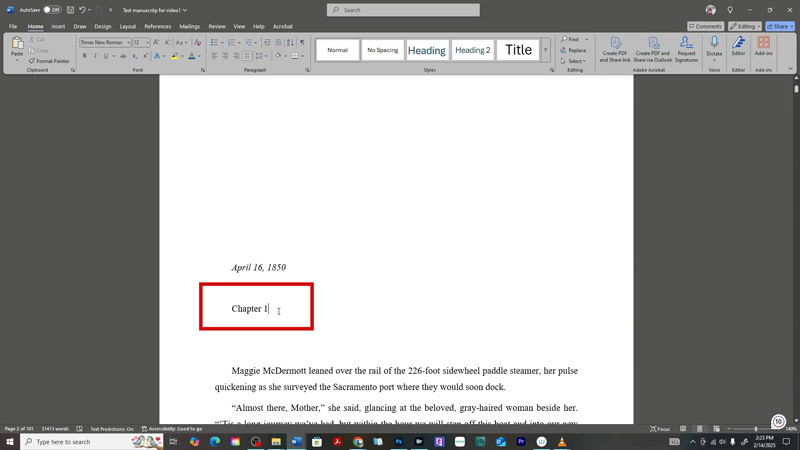
Highlight your TOC text (or type a sample like “Chapter 1 – Title” and highlight it).
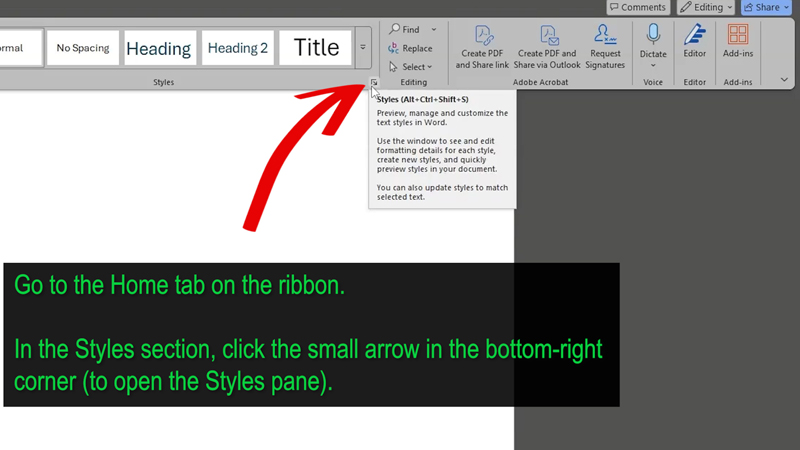
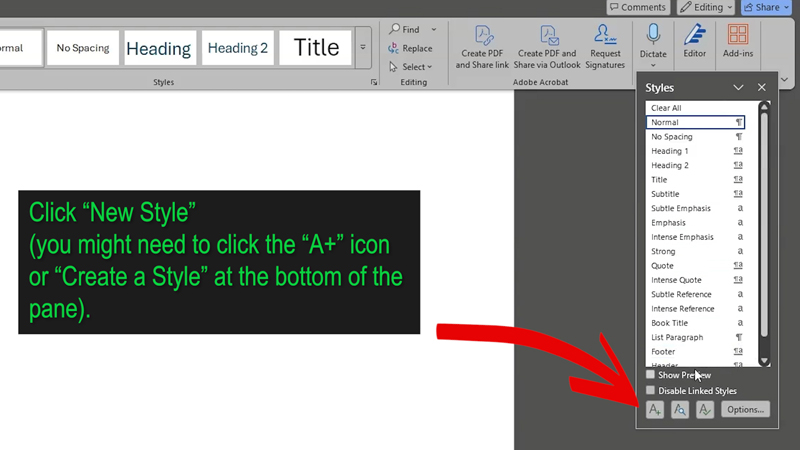
2. Go to the Home tab and click the small arrow in the bottom-right corner of the Styles group to open the Styles panel.
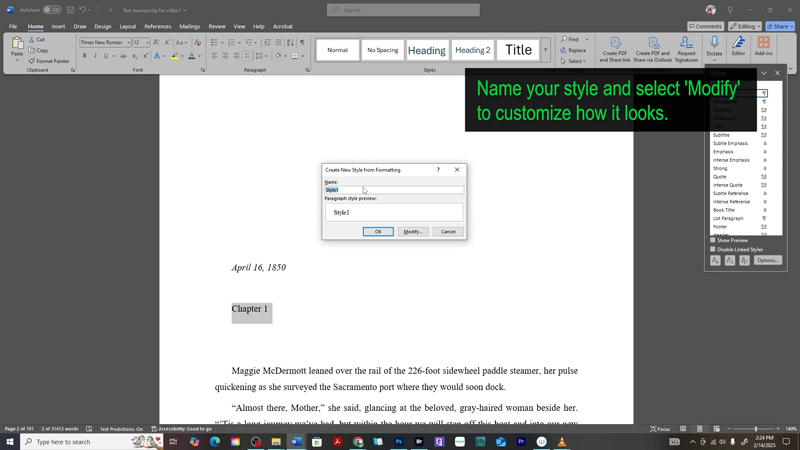
3. Click New Style, then select Modify.
3. Click New Style, then select Modify.
4. Name your style something like TOC Style.
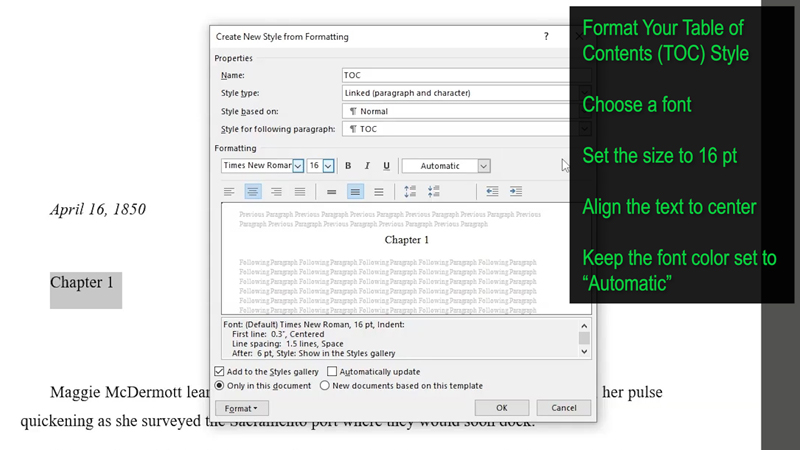
5. In the Modify Style box:
- Set the font you want (e.g., Times New Roman or Georgia).
- Set the font size to 16 pt.
- Click the center align button.
- Keep the color set to Automatic.
6. Click Format → Paragraph to adjust spacing if needed:
- Spacing after: 6 pt
- Line spacing: Single or 1.5
- Indentation: 0
7. Check “Add to the Styles gallery” (optional for quicker access later), then click OK.
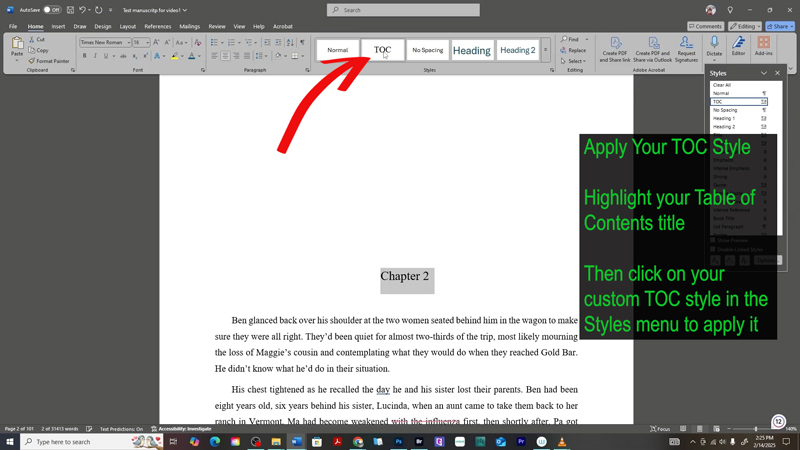
8. Apply your new TOC style to each chapter title you want included in the clickable Table of Contents. This ensures all entries look the same and keeps your ebook clean, organized, and easy to navigate.
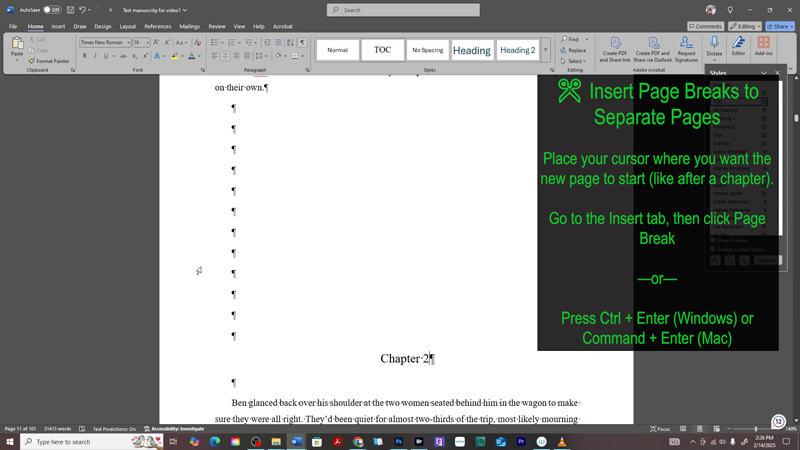
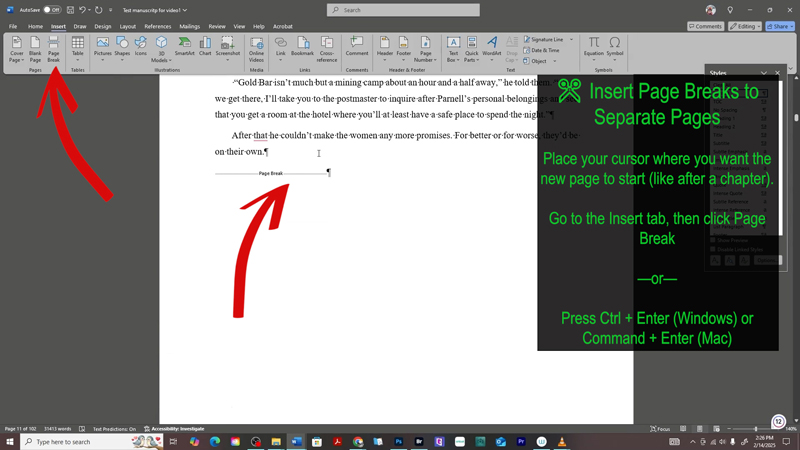
 Step 9: Insert Page Breaks Between Chapters
To make your ebook look polished and professional on Kindle devices, it’s important to start each new chapter or major section on a fresh page. That’s where page breaks come in.

-
Place your cursor at the end of a chapter or section.
-
Go to the Insert tab on the toolbar.
-
Click Page Break (or press Ctrl + Enter on your keyboard).

Using page breaks (instead of hitting Enter multiple times) ensures your formatting stays consistent across all e-reader devices and screen sizes. It keeps your chapters cleanly separated without leaving random blank space in your file.
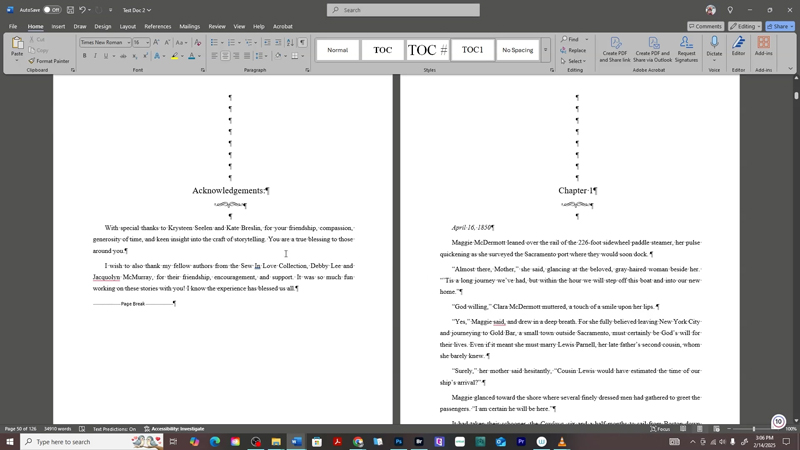
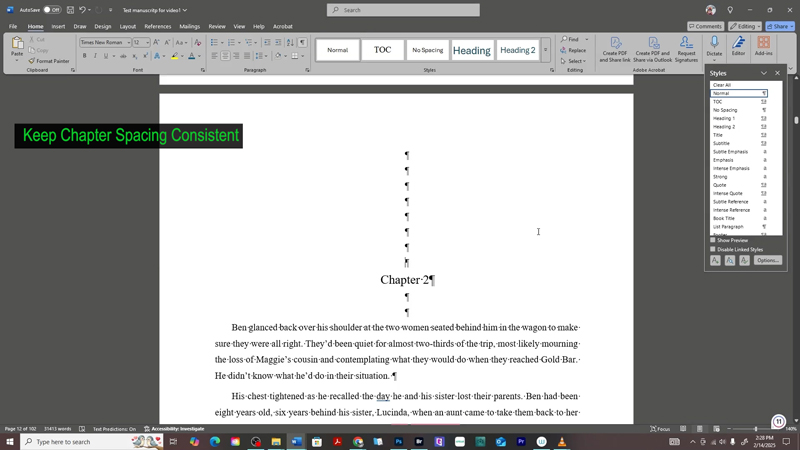
 Step 10: Keep Chapter Spacing Consistent
To make your ebook look clean and professional, ensure each chapter starts the same distance from the top of the page and has uniform spacing before and after the chapter title.

-
Insert 8 blank lines above the chapter title
-
Add 2 blank lines below the chapter title before starting the body text
This consistent spacing helps readers visually separate chapters and improves readability across devices.

If you’re using a custom chapter style, you can build this spacing directly into the style settings. Right-click the style, click Modify, then go to Format > Paragraph and set:
-
Spacing Before: 48 pt (roughly 8 lines)
-
Spacing After: 12 pt (about 2 lines)
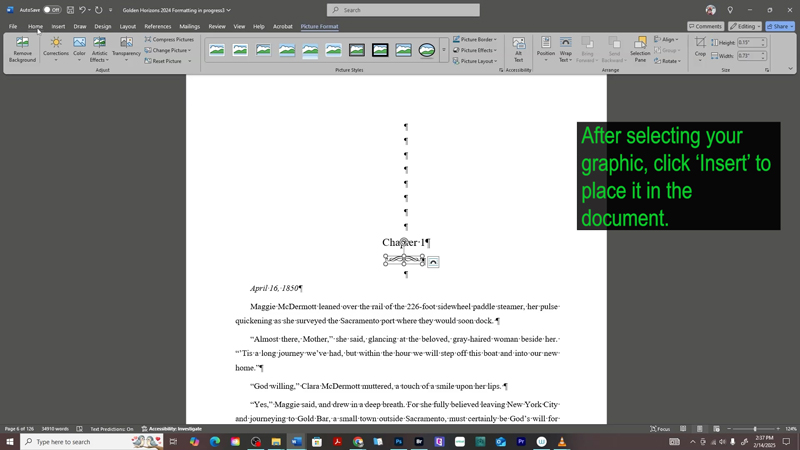
 Step 11 (Optional): Add an Embellishment Graphic Under Chapter Titles
Want to give your ebook a more polished or decorative look? Adding a small embellishment graphic under each chapter title can enhance visual appeal—especially for genres like romance, historical fiction, or fantasy.
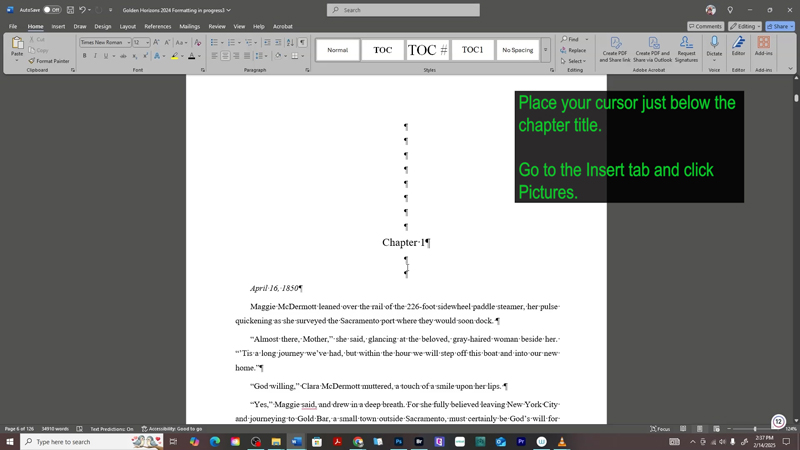
 Here’s how I do it:
I use a 160 x 33 pixel horizontal swish image under each chapter title.
 Steps to Insert Your Embellishment Graphic:
-
Place your cursor directly under the chapter title where you want the embellishment to appear.
-
Go to the Insert tab in the top menu.
-
Click Pictures > choose ‘This Device’ (or your image source).
-
Locate and select your 160 x 33 px graphic.
-
Click Insert.
-
Once inserted, click on the image to select it.
-
In the Layout Options (icon next to the image), choose ‘In Line with Text’ so it stays positioned correctly.
-
Use the center alignment button on the Home tab to center the image.

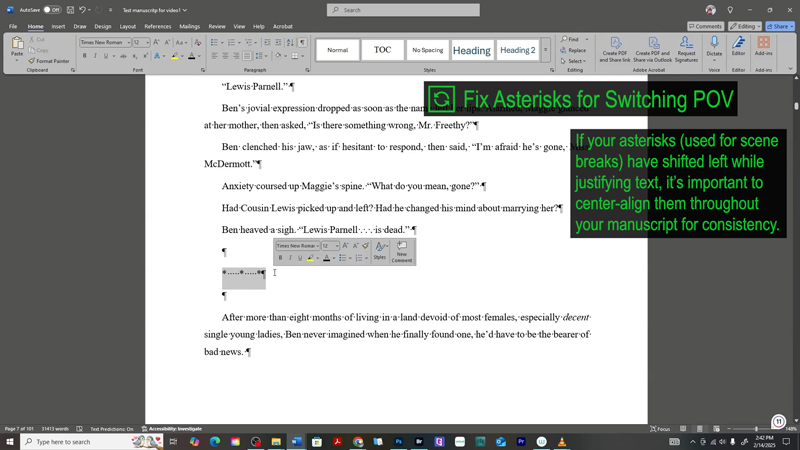
 Step 12: Center Scene Break Asterisks
Sometimes when you justify your text, the asterisks (*), which are often used to indicate a scene break or a POV shift, get shifted to the left side of the page.
To fix this:
-
Turn on ¶ (Formatting Marks) so you can clearly see where your breaks and spaces are.
-
Highlight the line of asterisks (or symbols like ***, **~**, etc.).
-
Go to the Home tab and click the Center Alignment button.
-
Repeat for every instance in your manuscript where a scene break appears.

 Step 13: Clean Up Miscellaneous Formatting Errors
Before you finalize your manuscript, take a few minutes to remove any leftover formatting issues that might accidentally appear in your published ebook.


-
Select the highlighted or colored text.
-
Go to the Home tab.
-
Set Text Highlight Color to None.
-
Set Font Color to Automatic.

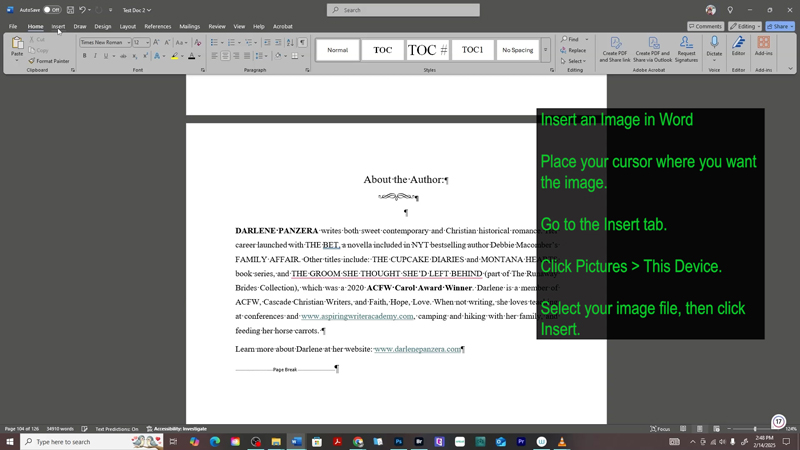
 Step 14: Insert an Author Image Above Your Author Bio
Adding an author photo helps readers connect with you—and gives your ebook a polished, professional look.
Here’s how to do it:
-
Scroll to your “About the Author” section near the end of your manuscript.
-
Place your cursor above your bio.
-
Go to the Insert tab → click Pictures → choose This Device to upload your image.
-
Select your author photo and click Insert.

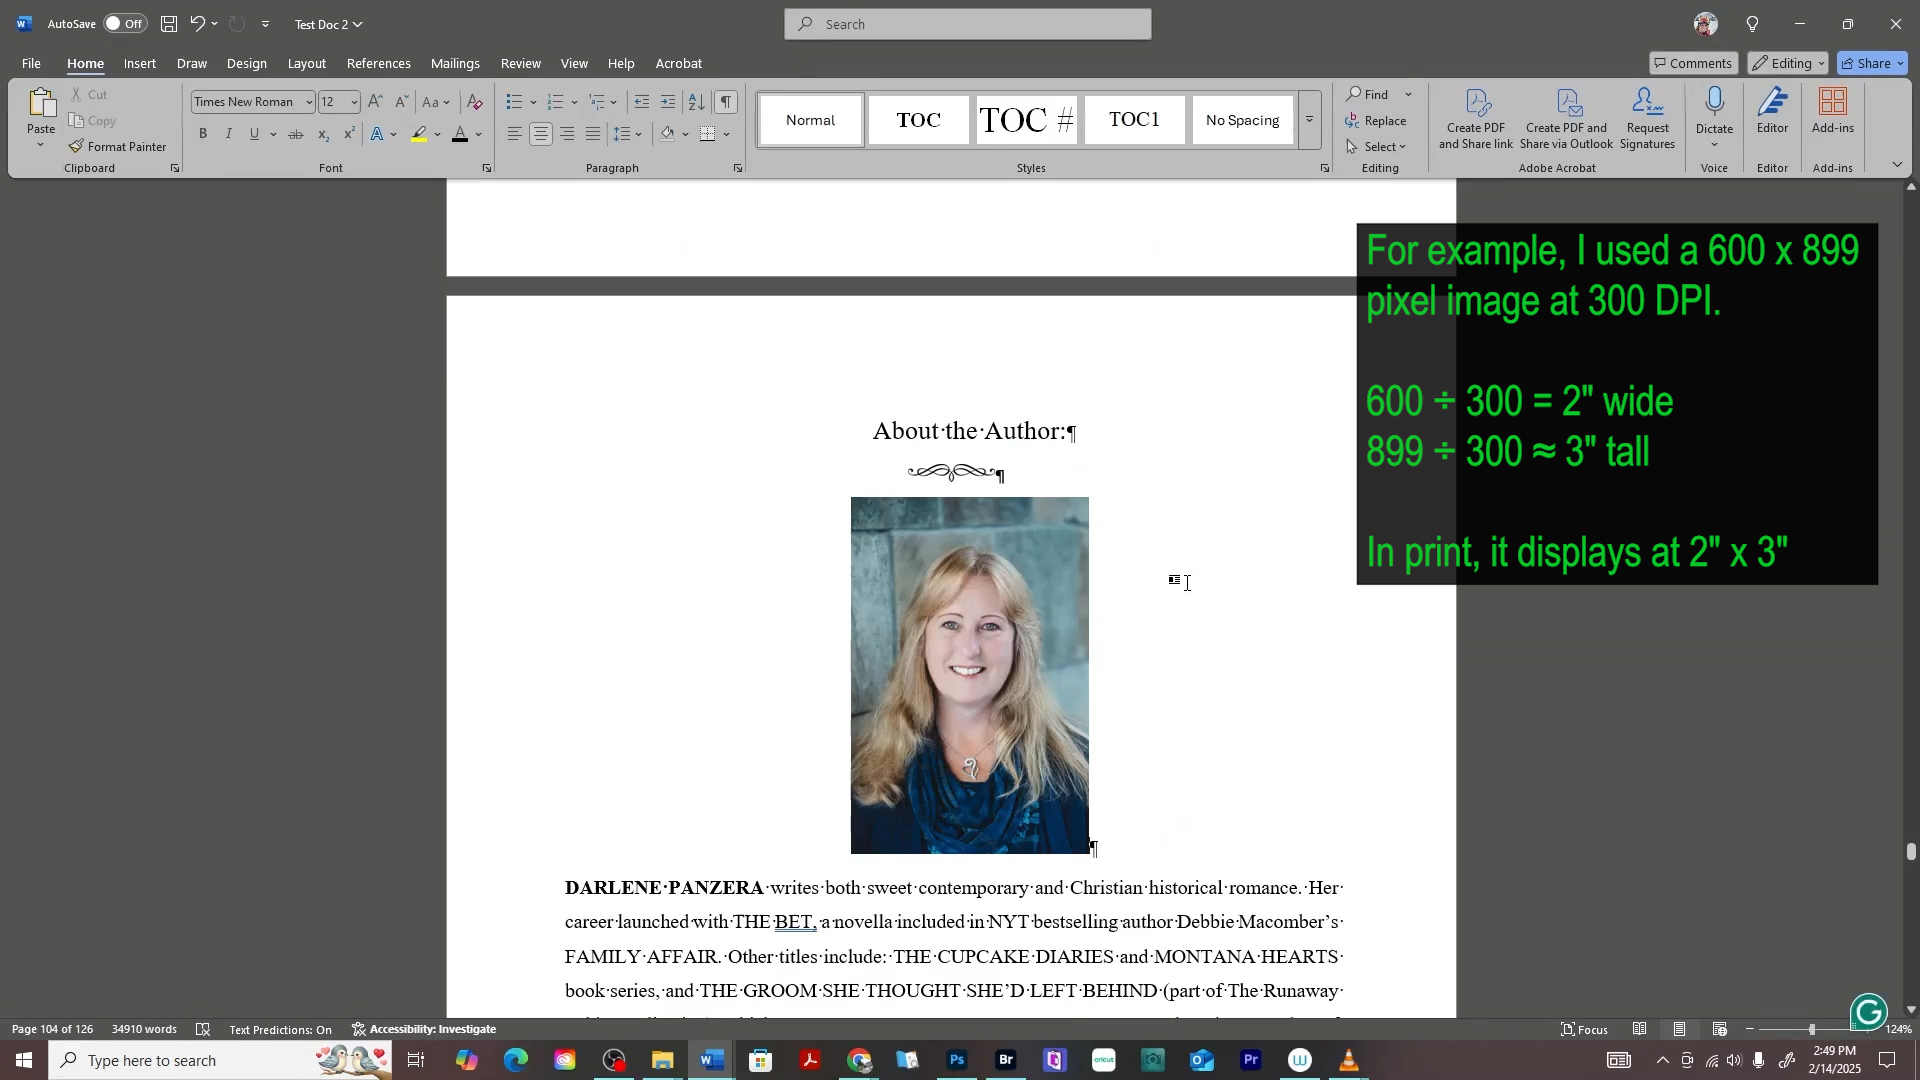
I used an image that’s 600 x 899 pixels at 300 DPI, which displays at about 2 inches wide by 3 inches tall in your ebook.

-
After inserting:
-
Set Wrap Text to In Line with Text (this is the most reliable for Kindle formatting).
-
Center the image above your bio for a clean layout.
-

 Step 15: Insert Clickable Links (Author Website, Newsletter Signup, etc.)
Clickable links are a great way to stay connected with your readers and build your author platform—especially at the end of your ebook.
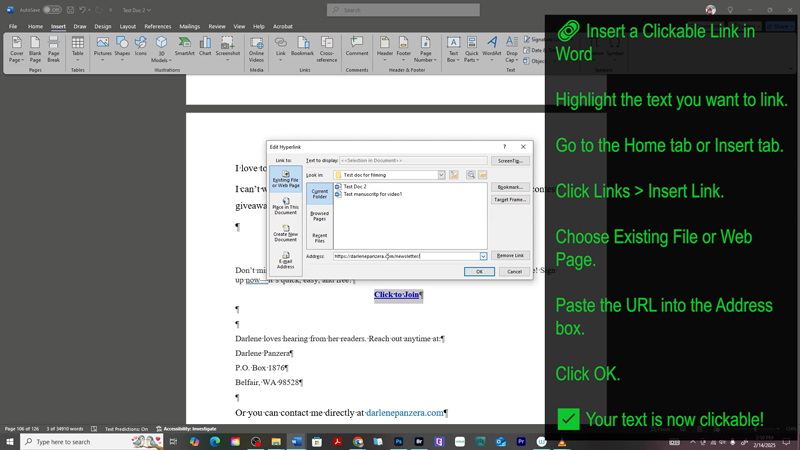
Here’s how to insert a clickable link in Microsoft Word:
-
Highlight the text you want to turn into a link (e.g., Visit My Website or Join My Newsletter).
-
Right-click the highlighted text and choose Link, or go to the Insert tab and click Link.
-
In the window that opens:
-
Select Existing File or Web Page
-
In the Address bar, paste your URL (e.g.,
https://yourwebsite.com/newsletter)
-
-
Click OK.


-
In your About the Author section
-
On a dedicated “Connect with Me” page
-
After a bonus chapter or sample of your next book
 Step 16: Insert Your Book Cover at the Beginning of Your Manuscript
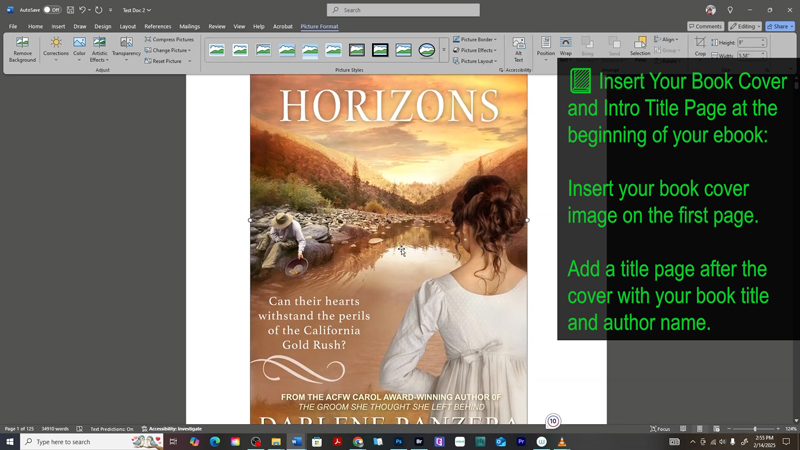
Before you publish, it’s a good idea to include your book cover image at the very beginning of your manuscript—especially if you're uploading a Word file to Amazon KDP.
Here’s how to do it in Microsoft Word:
-
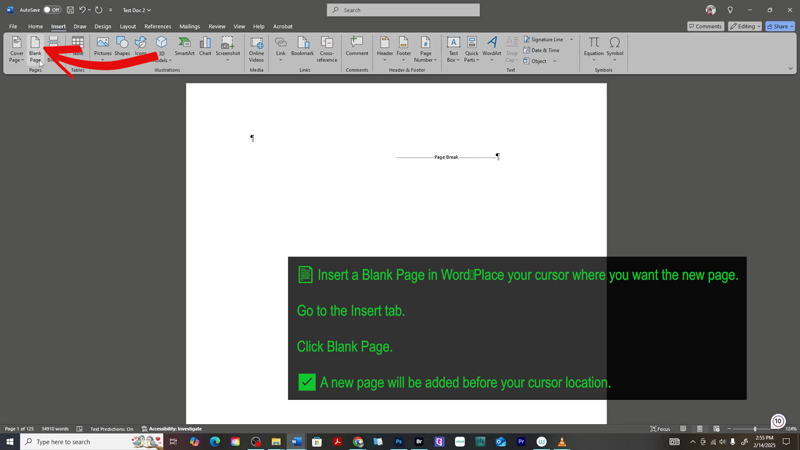
Insert a blank page at the top of your document:
-
Place your cursor at the very beginning.
-
Go to the Insert tab → Click Blank Page.
-
2. Insert your book cover image:
- While on the blank page, go to the Insert tab → Click Pictures → Choose your book cover image.
- Make sure your image is already sized appropriately (usually around 1600 x 2560 pixels at 300 dpi for a standard ebook cover).
- Avoid resizing inside Word to maintain image quality.
3. Center the image:
- Click the image, go to the Layout Options, and choose In Line with Text.
- Then center the image using the Paragraph alignment tools.

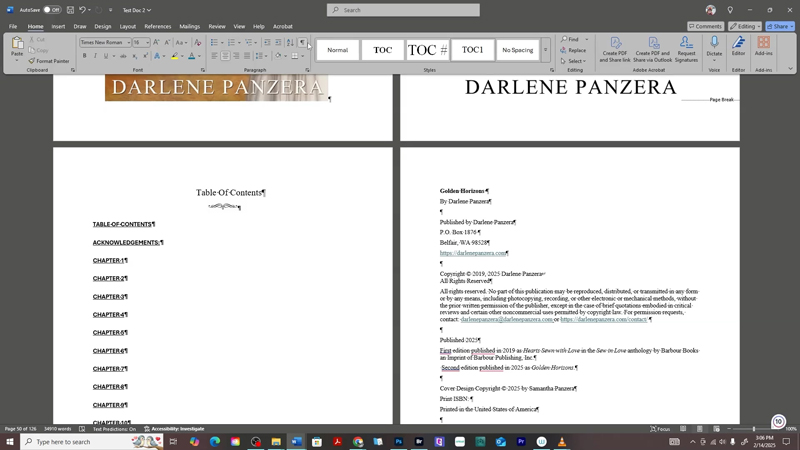
 Step 17: Create a Copyright Page
A copyright page is essential in every published book, even ebooks. It helps protect your intellectual property and provides important legal and publishing details.
To create your copyright page in Microsoft Word:
-
Insert a blank page after your title or cover page.
-
Go to the Insert tab → Click Blank Page.
-
-
Add your copyright text in a simple, readable font (like Times New Roman or Garamond, 12 pt).
-
Sample Copyright Page Template:
Copyright © [Year] [Author Name]
All rights reserved.
No part of this book may be reproduced, stored in a retrieval system, or transmitted in any form or by any means—
electronic, mechanical, photocopying, recording, or otherwise—without the prior written permission of the publisher,
except for brief quotations used in reviews or scholarly works.
This is a work of fiction. Names, characters, places, and incidents are either the product of the author’s imagination
or used fictitiously. Any resemblance to actual events, locales, or persons, living or dead, is entirely coincidental.
Cover design by [Designer Name, if applicable]
ISBN: [Insert your ISBN here]
First Edition
[Author Website or Publisher Name]
4. Center or left-align the text based on your style preference. Avoid bold fonts or stylized formatting here—keep it professional and simple.
 Step 18: Insert a Clickable Table of Contents (TOC)
A clickable Table of Contents helps readers easily navigate your ebook and is essential for publishing on Amazon KDP.
 To insert a clickable TOC in Microsoft Word:
-
Place your cursor where you want the TOC to appear (usually after your copyright or title page).
-
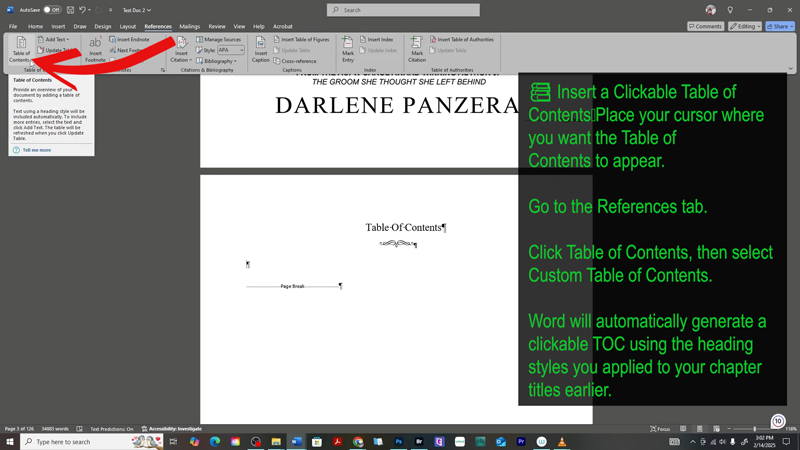
Go to the References tab.
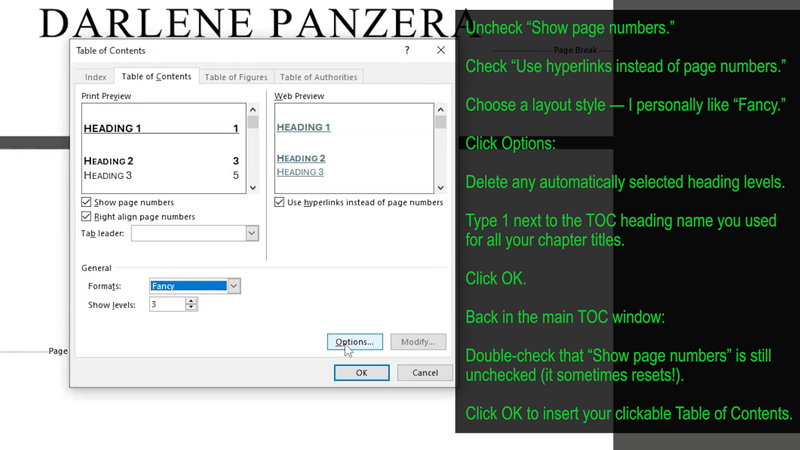
3. Click Table of Contents → Choose Custom Table of Contents.
4.In the popup window:
- Uncheck "Show page numbers."
- Check "Use hyperlinks instead of page numbers."
- Choose a layout style you like (I personally use Fancy).
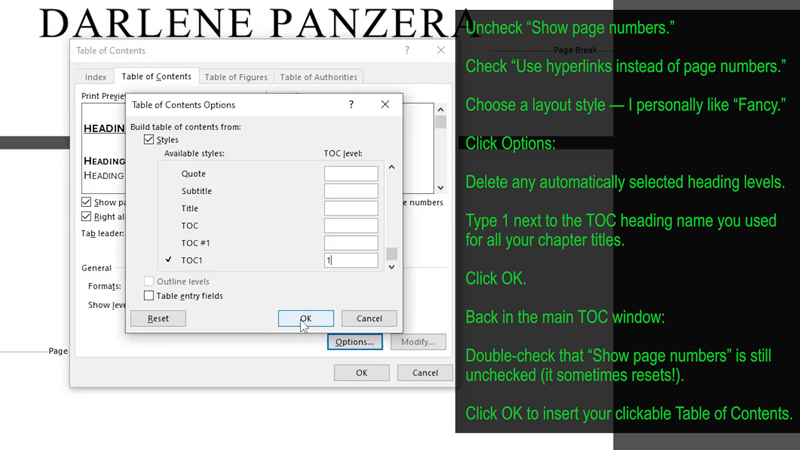
- Click Options.
-
-
-
Delete any automatically filled numbers.
-
Type
1next to the heading style you used for your chapter titles. -
Click OK.
-
-
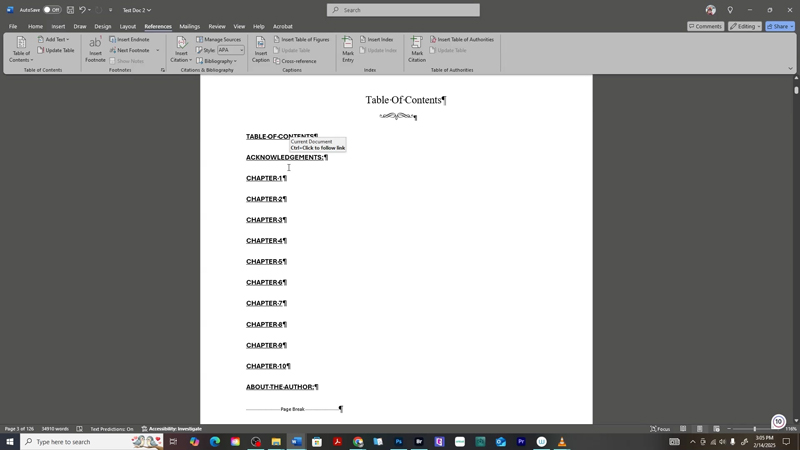
5. Back in the Table of Contents window:
-
-
Double-check that "Show page numbers" is still unchecked (sometimes it re-checks itself).
-
Click OK to insert your TOC.
-
💡 Make sure all your chapter titles are consistently formatted with the same Heading Style so Word knows what to include in the TOC.
 Step 19: Double-Check for Miscellaneous Errors
Before you upload your manuscript, take time to carefully review it for any leftover formatting issues that may have been missed.
 Things to look for:
-
Extra spaces or line breaks
-
Incorrect fonts or font sizes
-
Inconsistent indentation
-
Leftover highlights or colored text (especially red or yellow)
-
Stray formatting marks (use the ¶ button to check)
-
Misaligned asterisks used for scene breaks
-
Wrong text color (make sure it’s set to Automatic)
Tip: Scroll slowly through your entire manuscript to catch anything unusual. It’s easy to miss small details that could affect how your book appears to readers.
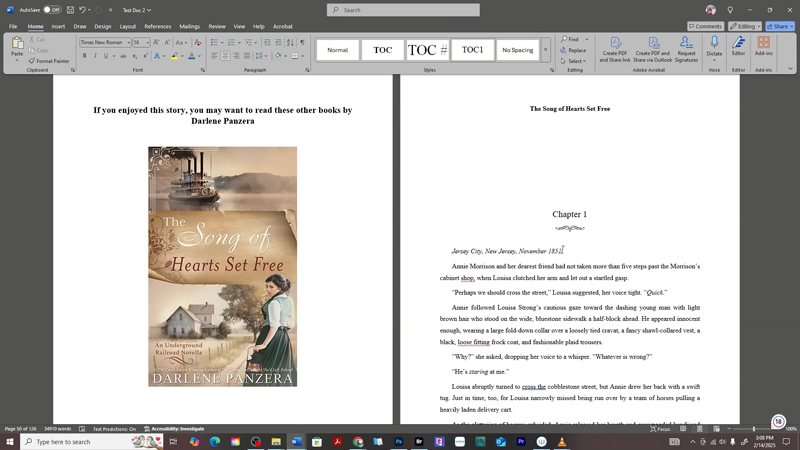
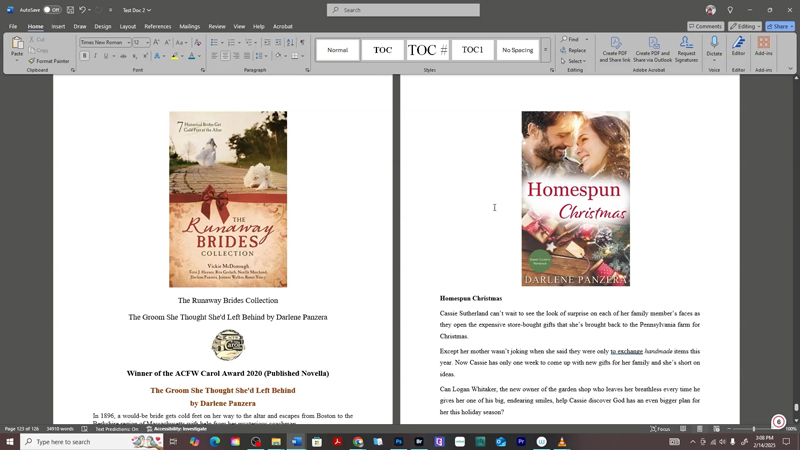
 Step 20: Add Your Back Matter Content
The back of your ebook is valuable real estate—use it to connect with readers, promote your other books, and build your author brand.
 What to include in your back matter:
-
A “Dear Reader” letter – Share a personal thank you, invite readers to leave a review, or let them know how to stay connected.
-
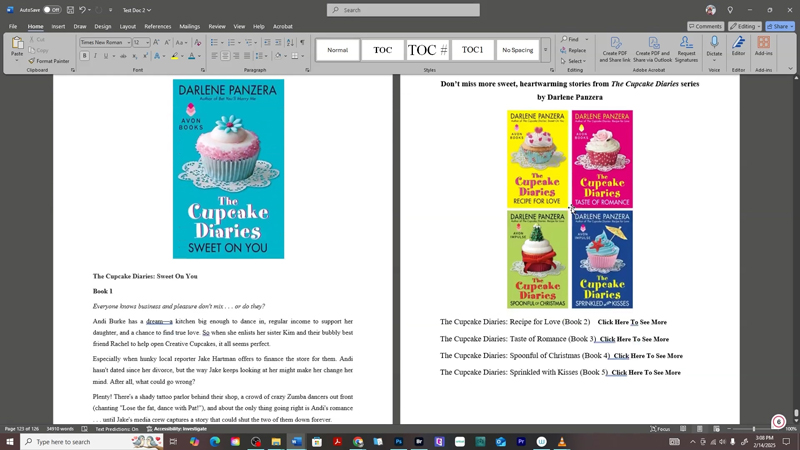
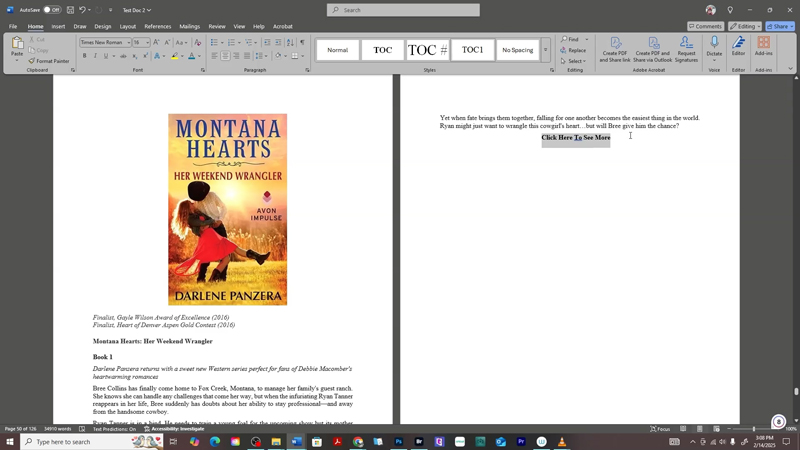
Sneak peek of your next book – Include the cover, a short teaser or the first chapter, and a clickable link to buy.
-
Covers and blurbs for your other books – Add images of your other book covers, back cover blurbs, and direct purchase links (make sure they're clickable!).
-
Author newsletter sign-up link – Invite readers to join your email list for updates, exclusive content, or free bonuses.
-
Fun extras – Include fun extras like book club questions, bonus scenes, character quizzes, or behind-the-scenes notes to keep readers engaged and excited about your next book.
Tip: Keep your formatting clean and consistent. Use headings and spacing that match the rest of your ebook, and double-check that all links are working.
Examples:
Now that you've learned how to format your ebook in Microsoft Word for Amazon KDP, you're one big step closer to hitting “Publish”! Taking the time to get your formatting right ensures your book looks polished and professional on every Kindle device. If you're ready to move on to the next phase, I highly recommend checking out my full blog post and YouTube video, Amazon KDP for Beginners: A Step-by-Step Guide to Self-Publishing. You'll learn exactly how to upload your newly formatted ebook to Amazon KDP, from start to finish. You've got this!
Have questions about formatting your ebook in Word? Drop them in the comments below—I’m happy to help!

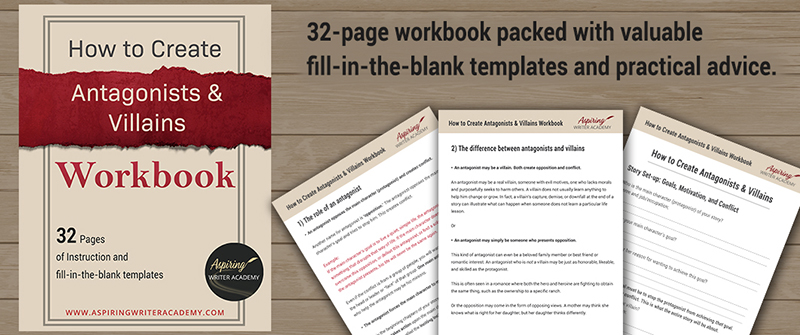
Do you find it difficult to create compelling antagonists and villains for your stories? Do your villains feel cartoonish and unbelievable? Do they lack motivation or a specific game plan? Discover the secrets to crafting villains that will stick with your readers long after they finish your story, with our How to Create Antagonists & Villains Workbook.
This 32-page instructional workbook is packed with valuable fill-in-the-blank templates and practical advice to help you create memorable and effective antagonists and villains. Whether you're a seasoned writer or just starting out, this workbook will take your writing to the next level.
We Believe All Authors Can Aspire to Take Their Writing to the Next Level!
Our Goal for Aspiring Writer Academy is to help people learn how to write quality fiction, teach them to publish and promote their work, and to give them the necessary tools to pursue a writing career.
ENTER YOUR EMAIL BELOW
TO GET YOUR FREE
"Brainstorming Your Story Idea Worksheet"
7 easy fill-in-the-blank pages,
+ 2 bonus pages filled with additional story examples.
A valuable tool to develop story plots again and again.
Other Blog Posts You May Like
Pros & Cons of Traditional vs. Self-Publishing Fiction
What Authors Need to Know About ISBN Numbers Before Self-Publishing
Biggest Self-Publishing Mistakes New Authors Make
The Ultimate Guide to Using ChatGPT for Book Title Inspiration
Amazon KDP for Beginners: A Step-by-Step Guide to Self-Publishing
How to Write a Subtitle That Sells Your Book: Self-Publishing Success
100 Essential Writing and Publishing Terms All Authors Should Know
Step-by-Step Guide: How To Make Your Book Free on Amazon KDP
Amazon A+ Content for Authors: What It Is and How to Get Started
What’s The Difference Between Amazon KDP And KDP Select? Everything Authors Need to Know
Amazon KDP vs. IngramSpark: Which Self-Publishing Platform Is Right for Your Book?
How to Get Your Book into Libraries and Bookstores: Amazon KDP vs. IngramSpark
Best Podcasts for Writers Who Want To Advance Their Writing Career
Samantha Panzera is an adventurous travel blogger, graphic designer, and multi-media business entrepreneur who uses the experience she’s gained over the years to teach aspiring writers the skills they need to build an author platform and take their careers to the next level.






![How to Format Your Ebook in Microsoft Word for Amazon KDP (Step-by-Step Guide) To create a copyright page, insert a new blank page at the beginning or end of your ebook. On this page, include the copyright symbol (©), year of publication, and the author's name (e.g., © 2025 [Author Name]). You can also add a statement like 'All rights reserved.' This page informs readers of the copyright protection of your work.](https://www.aspiringwriteracademy.com/wp-content/uploads/2025/05/Descript-edit1.00_22_24_44.Still065.jpg)

